Mubasheera PullatDec. 21, 2022
Odoo Point of Sale is a great solution for managing your shops, restaurants, accounting, Inventory and sales. It is a user-friendly interface and Compatible with any device without difficulty.Although the point of sale requires an internet connection to start, it remains functional even after a complete disconnection. which means that you can easily manage your offline store in Odoo anywhere, anytime.
This blog explains the basic operations of Odoo Point of Sale Module.
Point of Sale
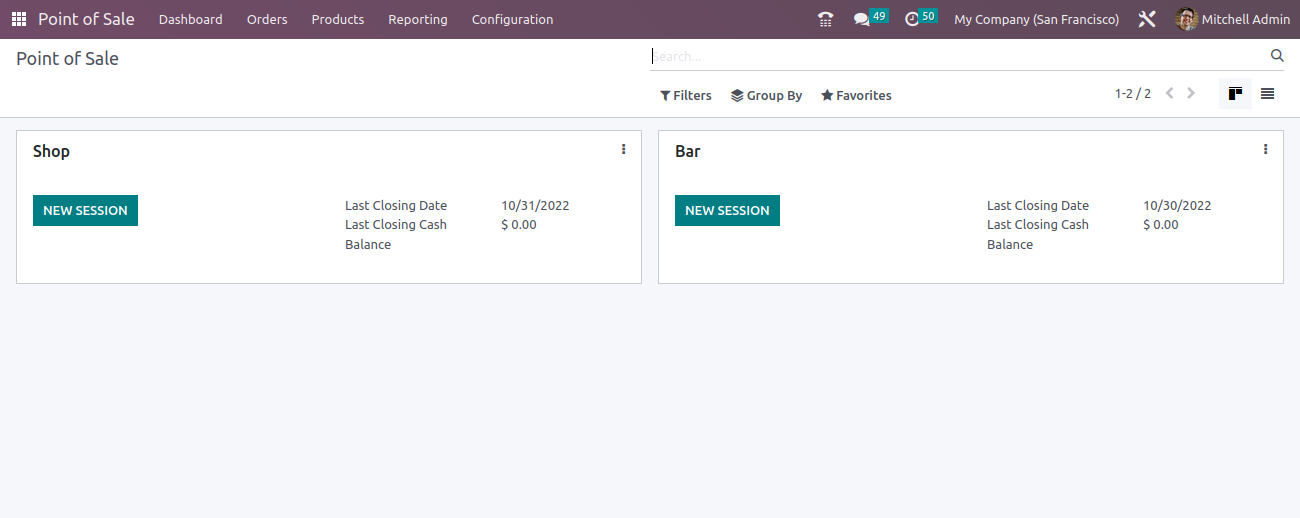
From the Odoo 16 Point of Sale module dashboard you can view the existing point of sale session. The Last Closing Date, Last Closing Cash and Balance are mentioned along with their names. New point of sale sessions can be created from the Configuration Settings.
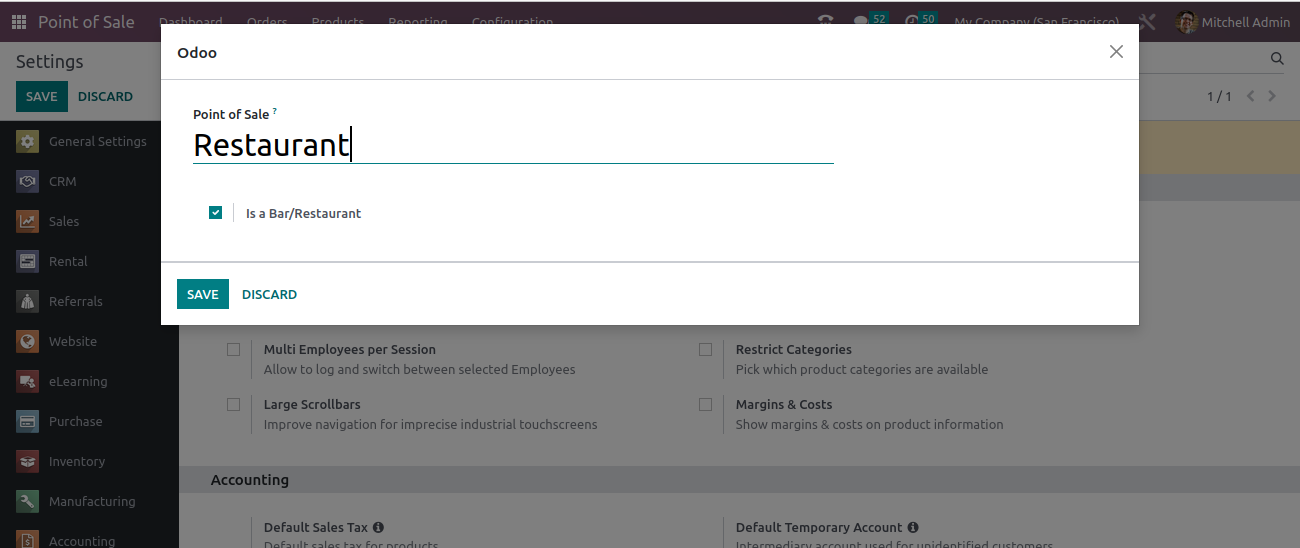
Configuration feature of Odoo Point of Sale ensures users to create point of sales as required by the company. Click on +New Shop icon inside the Configuration -> Settings to create a new Point of Sale session as shown in the screenshot below.
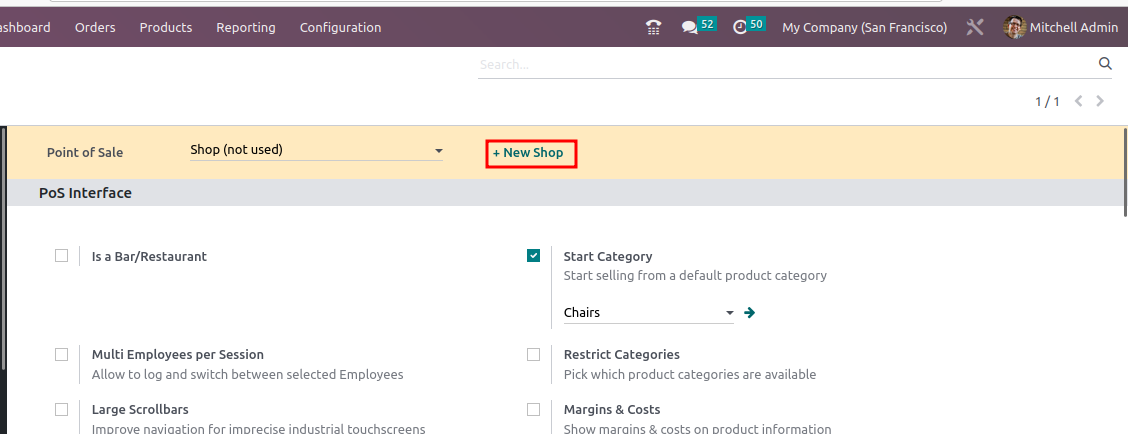
Point of Sale: Add a name for the point of sale
Bar/ Restaurant: If the check box is enabled, the point of sale is a bar or restaurant, or the point of sale is a shop
Orders
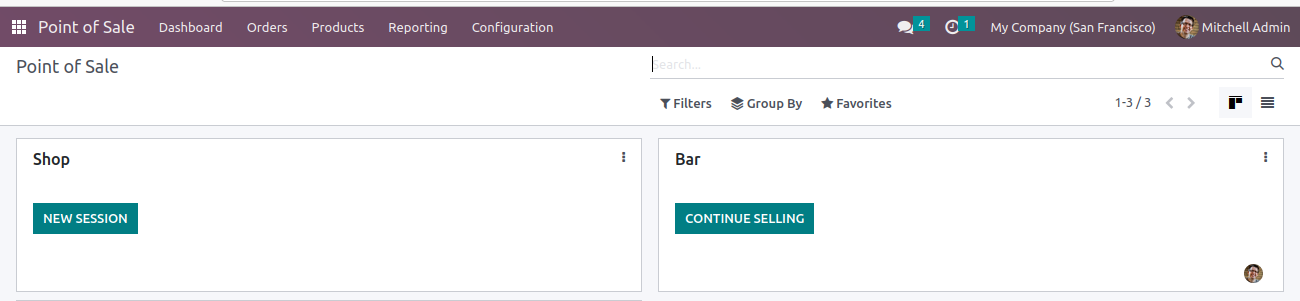
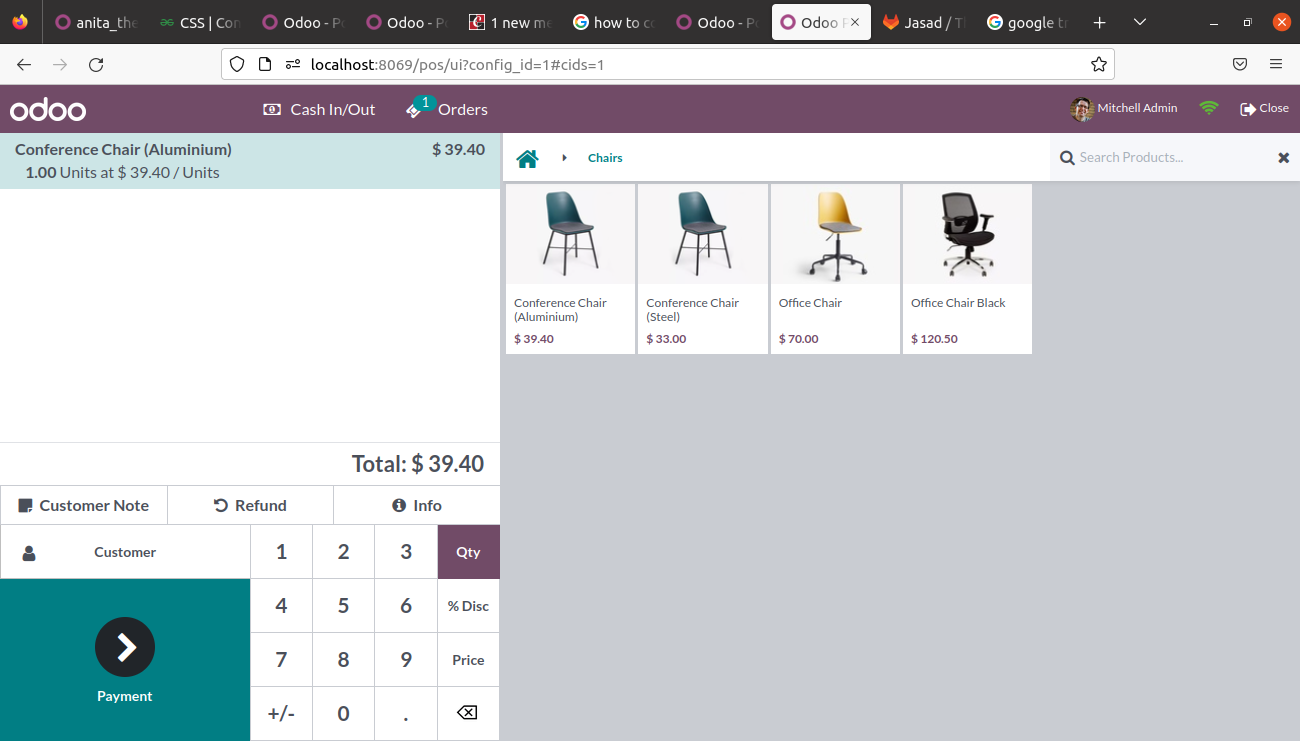
Let's see how to orders are taken and recorded in the Odoo POS module. You can select the NEW SESSION from the Point of Sale located on the dashboard or continue an existing session by selecting the CONTINUE SELLING option from the Point of Sale.
By selecting the new session option, you will be redirected to the order interface. Products are displayed with their price, display image and name. You can select categories of products view separately. So, you can choose the product easily. You can select the product from the product screen and then the order will be created. The selected orders will be displayed on the left side along with Unit Price, Unit quantity, Total Amount. Order summery get under the order along with subtotal and taxes. You can enable the Customer Notes option to add notes related to orders and enable the refund option for return the order as shown in the screenshot below.
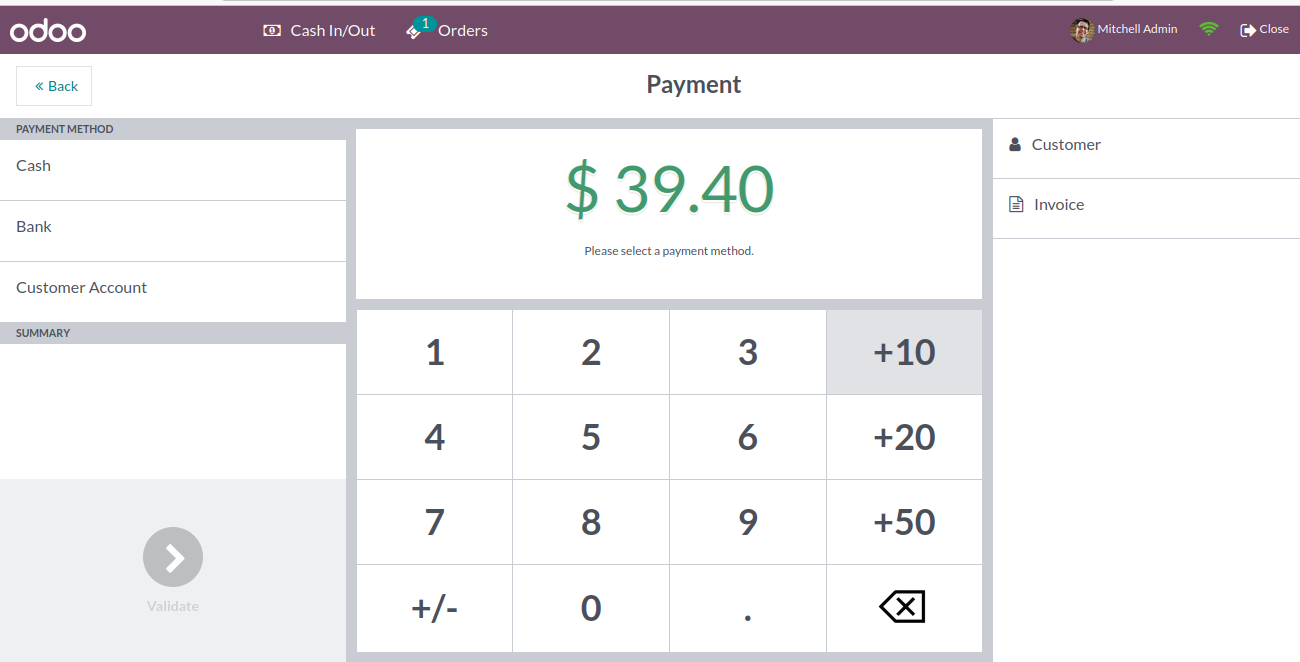
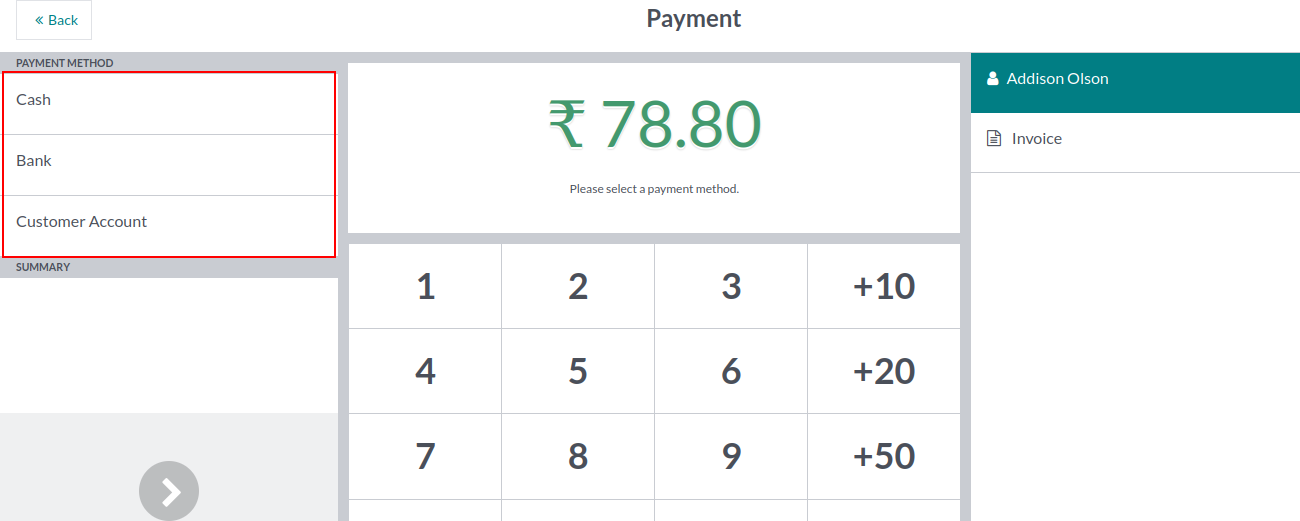
By selecting the payment button, you will be redirected to the payment screen. You can choose the payment method such as cash, bank or customer account. Enter the amount paid by the customer using the keypad. Select the Invoice button to generate the invoice. To validate the payment, select the Validate button.
The receipt will be displayed on the right side of the receipt screen, print the receipt by selecting the Print Receipt button. Also, the receipt can be emailed to the given mail id. Select New Order and it is redirected to New Order.
Sessions
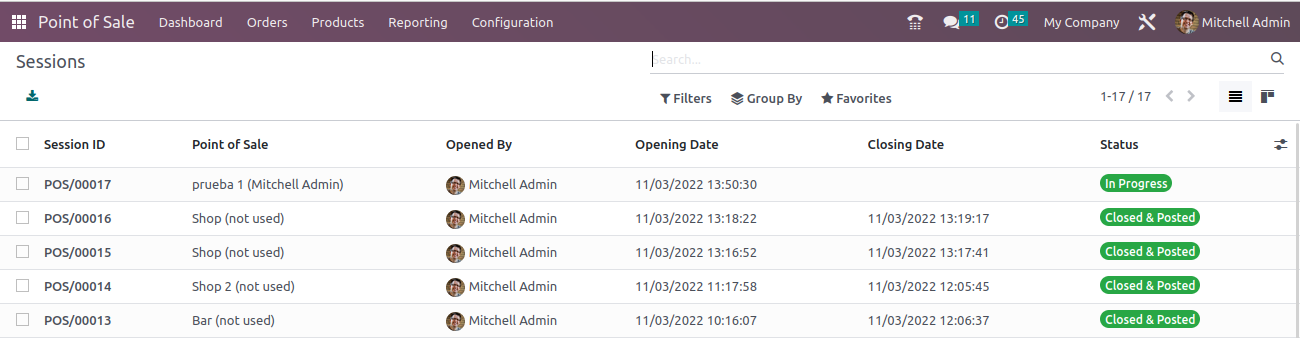
It is important to track the activities of all the sessions. In Odoo you can view the details that happened in each session by selecting the Sessions option from the Orders tab and also it will open up to the point-of-sale dashboard where you will be able to see your existing point of sales, go to Orders > Sessions. The list of sessions along with their details is displayed.
This will show you a list of all the sessions that have taken place at this point of sale. Let's go ahead and open the session currently In Progress Stage
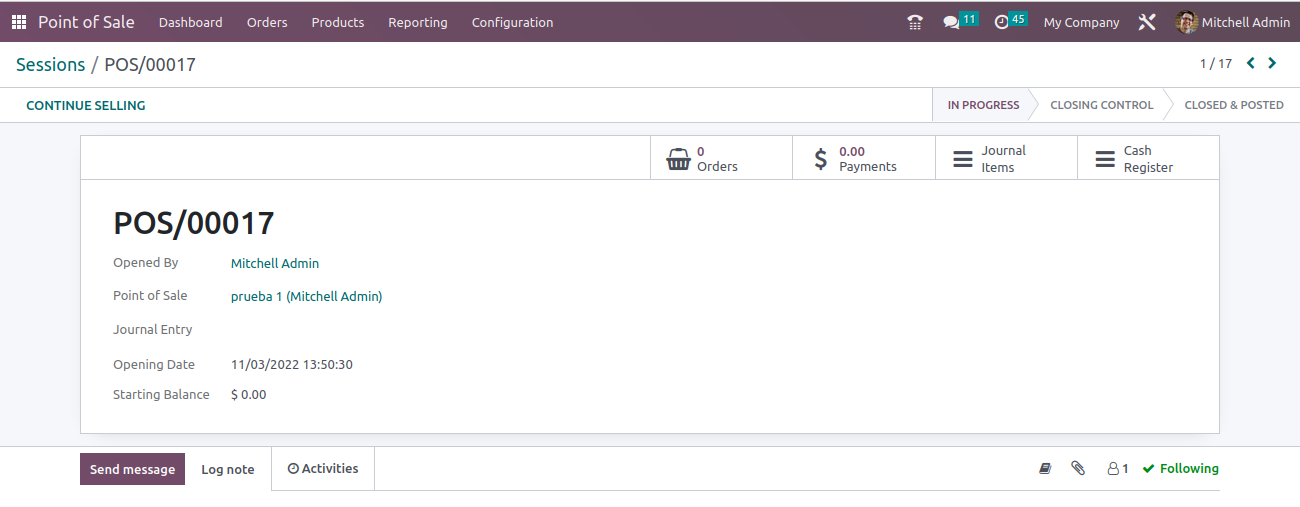
select them from the list. There you can show the image below
Rescue Sessions:
you force closed someone's session while they were still using it. Odoo will turn this closed session into a Rescue Session allowing the user to continue transacting payments.
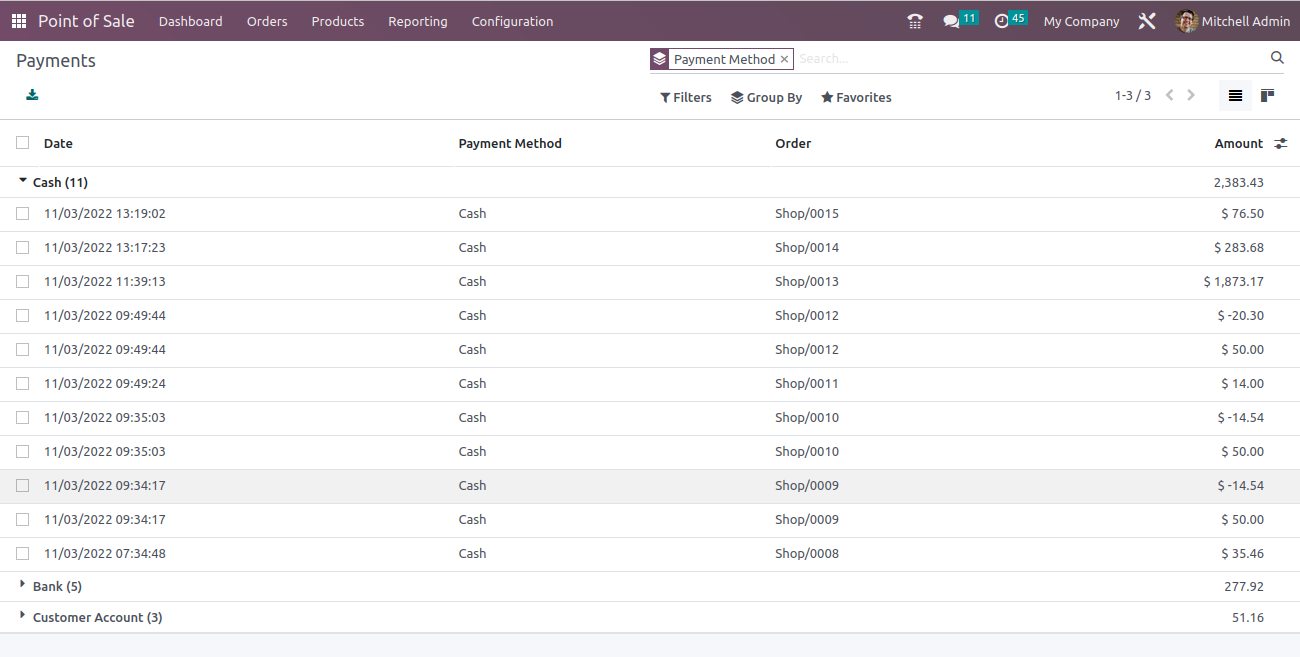
Payments:
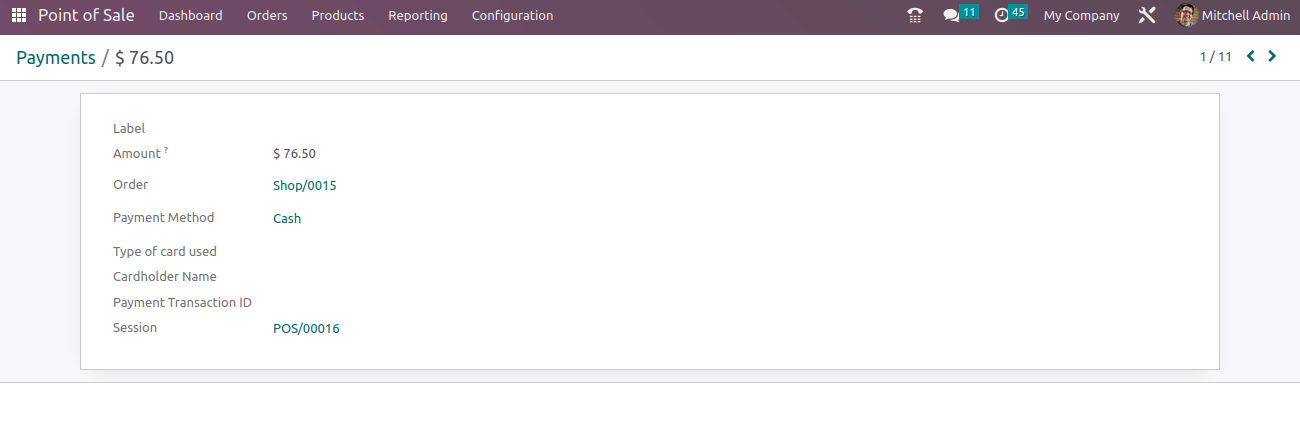
You can view the payments in each session by selecting the payment method. Each record contains the payment method, order reference number, date and time, and amount. You can group payments by payment method and session. As shown in screenshot below
Select them from the list. There you can show the screenshot below
Product Configuration
You can get product from product main menu, product configuration similar to other module. To make the product available at the point of sales, you can enable the Available in the POS field. You can enable the Scale Weight field and refer to the category used in the point of sale.
Discount & Loyalty
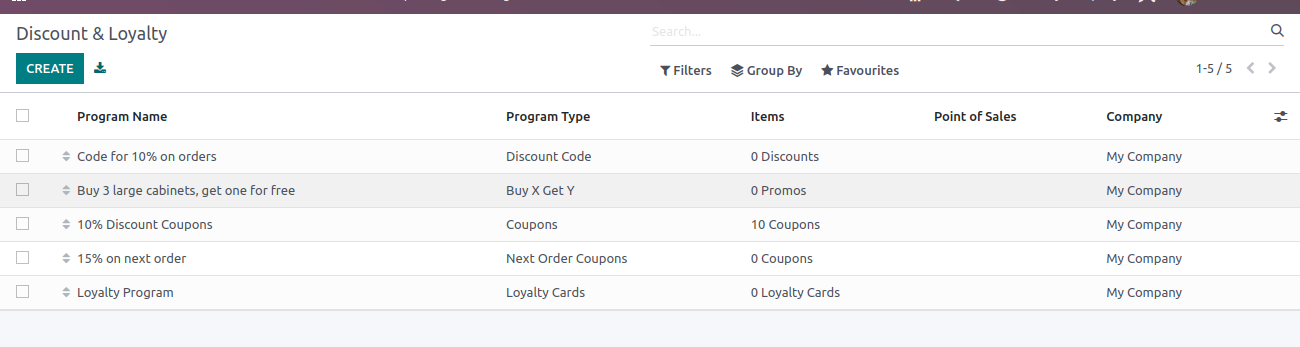
Odoo will give Discount & Loyalty Programs option from the Products menu of the Point-of-Sale module. These programs help to improve company market and attracts buyers, so company get new customers.
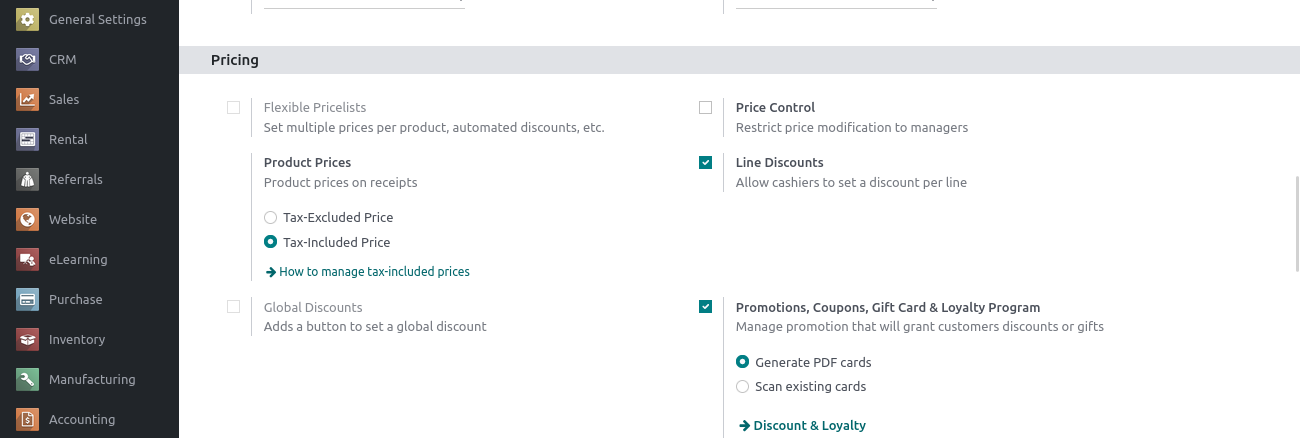
A user can enable the feature of Discount & Loyalty Programs by enabling Promotions, Coupons, Gift Card & Loyalty Program from configuring settings. For this, Go to Point of Sale > Configuration > Settings > Pricing > enable Promotions, Coupons, Gift Card & Loyalty Program
Now select Promotions, Coupons, Gift Card & Loyalty Program under product menu, we can see already created programs
Now create a new program by clicking CREATE button and then we will see a form
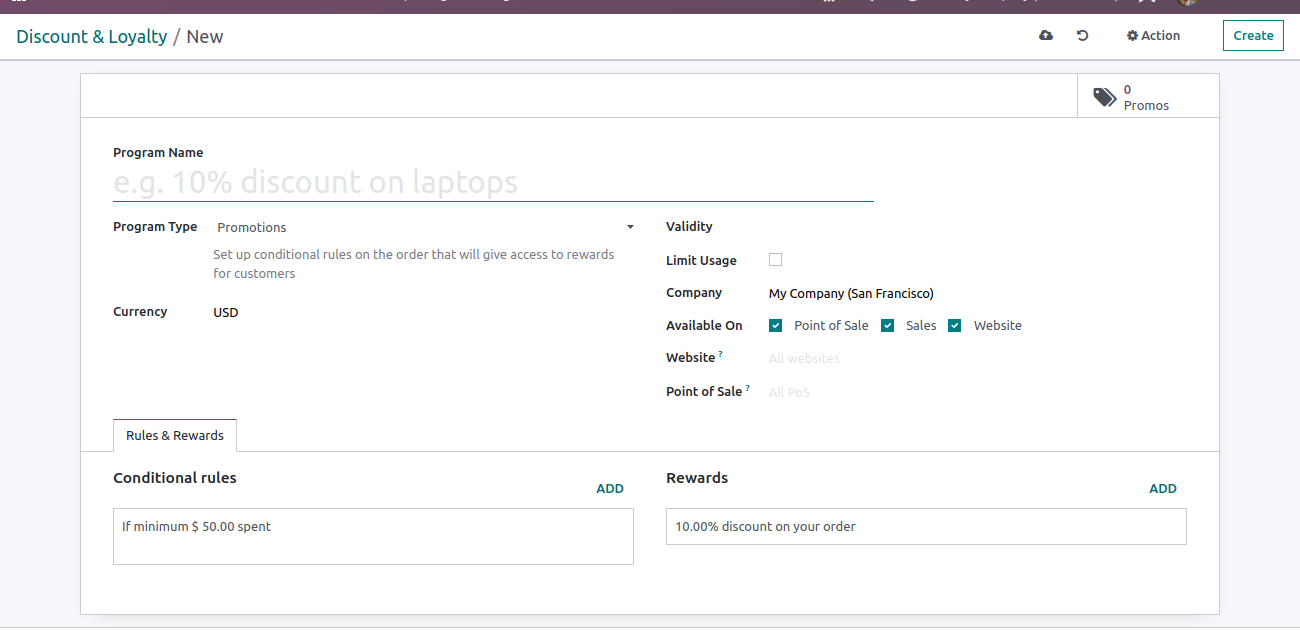
Promotion Name: It assigned name to promotion program.
Program Type: Rewards can be applied in different ways like Coupons, Loyalty Card, Promotions, Discount Code, Buy X Get Y and Next Order Coupons.
When program type is selected to coupons, then Number of coupons will be generated and this coupon can be availed during next order.
Validity: Program validity determines the date and time the program can be applied to subscriptions.
Limit Usage: How many times a program can be used by all customers before it becomes invalid. Enable the Limit Usage check box and then add how many times program can be used.
Rules and Rewards:
User can Create Conditional rules based on Minimum Quantity, Minimum Purchase by using ADD button.

On clicking the ADD button, you can see a popup window as shown in the image below
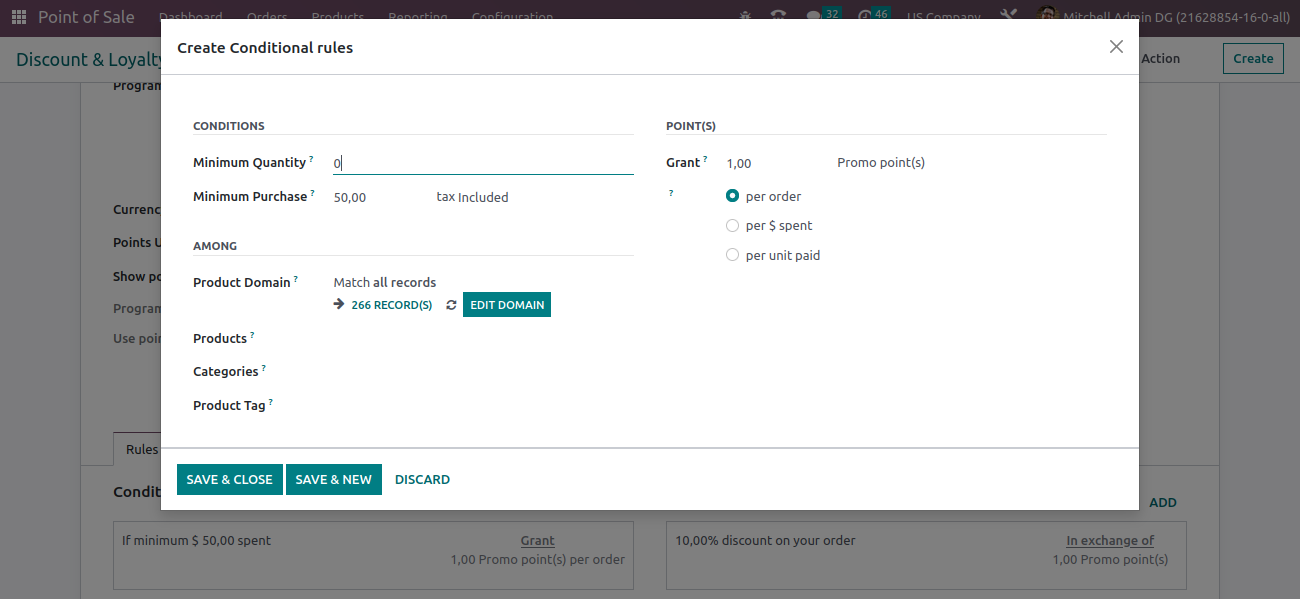
Quantity: In this field assign the minimum product quantity required to reach the reward.
Minimum Purchase: Enter the minimum purchase amount required to receive the reward in this field. Also select whether this minimum purchase amount is tax included or tax excluded.
Product Domain: If you want to apply this promotion program to all products, you don't need to apply filters. This will apply to all products by default. When you need to apply the promotion program for specific products, you can set some rules using the EDIT DOMAIN option and match your record with the required rule.
Products: You can to apply the promotion program for specific products.
Categories: You can to apply the promotion program for specific products Categories.
Product Tag: You can to apply the promotion program for specific products Tags.
Grant: Depending on your program conditions, you will need a minimum number of points, but each reward will cost you points.
Odoo allows you to redeem reward points in various measures. You can apply per order or you can set per Money spent and also you have to apply a per unit paid.
Rewards:
Rewards are promotions that businesses offer to their customers that Discount of items or Free product, Free shipping or using specific criteria.
you can Create Rewards rules based on Reward Type, Discount, Points by using ADD button.
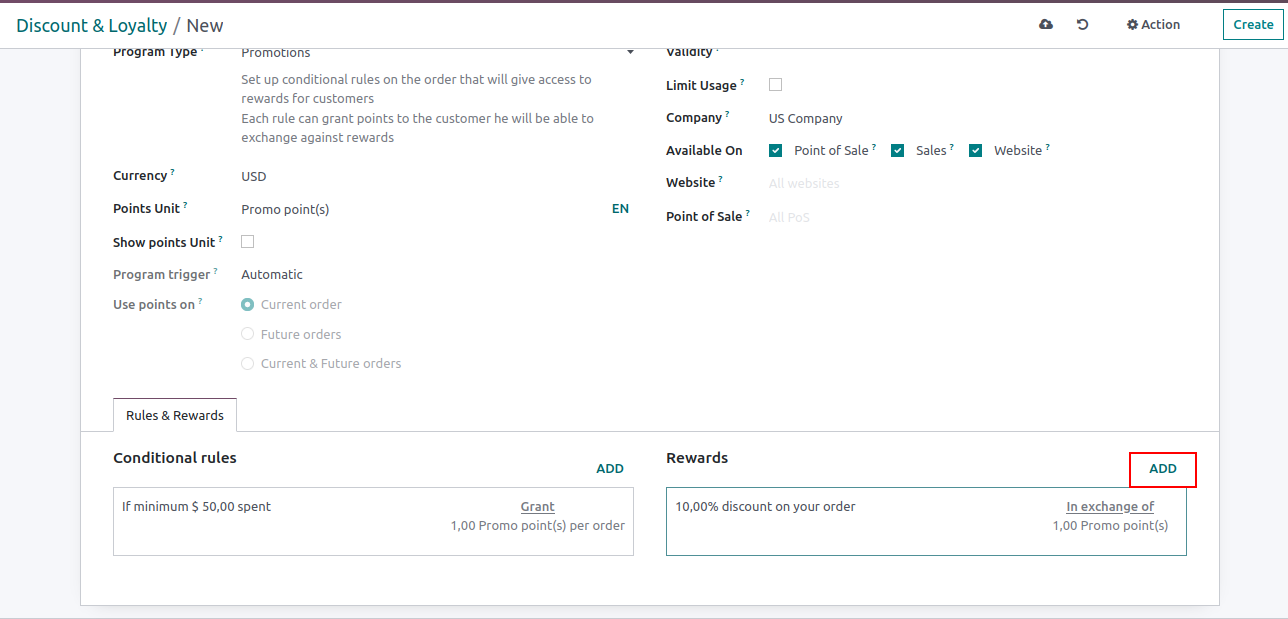
On clicking the ADD button, you can see a popup window as shown in the image below
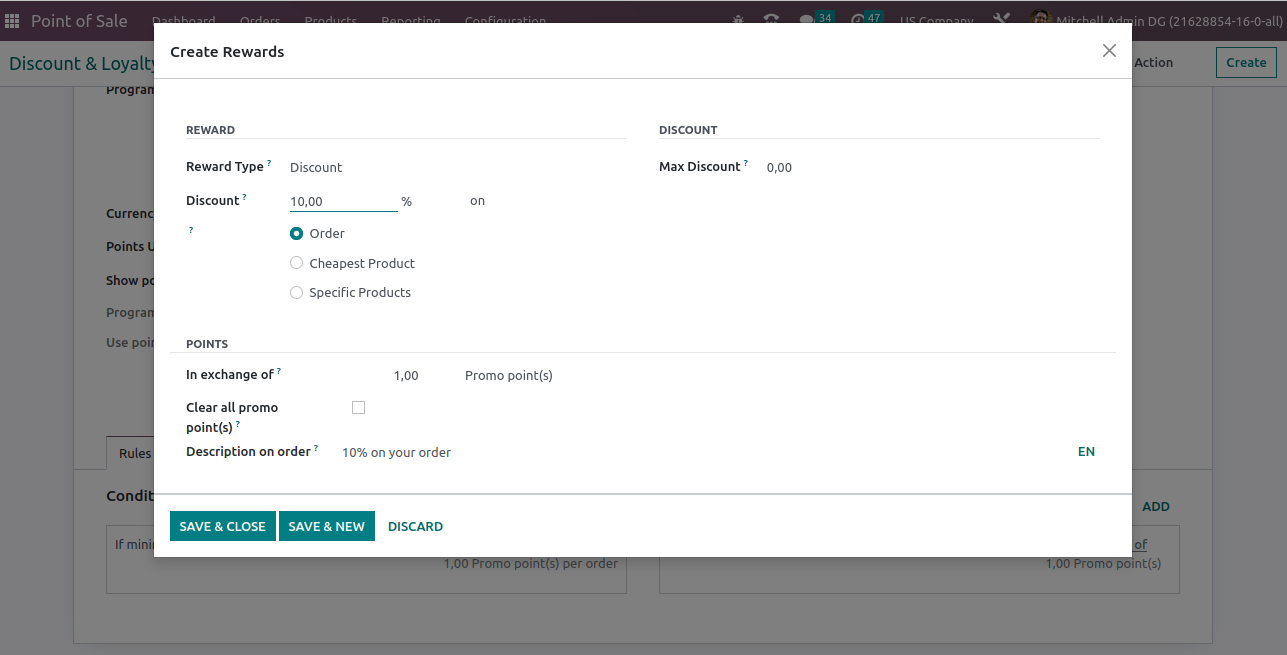
Reward Type: Here are 3 Reward types used by retail and e-commerce businesses:
1.Free Product:
2.Discount
3.Free Shipping
Reward Type as a Free product:
Offering free product as a reward to your customers is a great way to give back to your most loyal program members. Set Reward type with Free product
Quantity Rewarded: Amount of free product quantity for each reward is mention here.
Product: Mention free product for reward
Product Tag: Mention free product Tag for reward
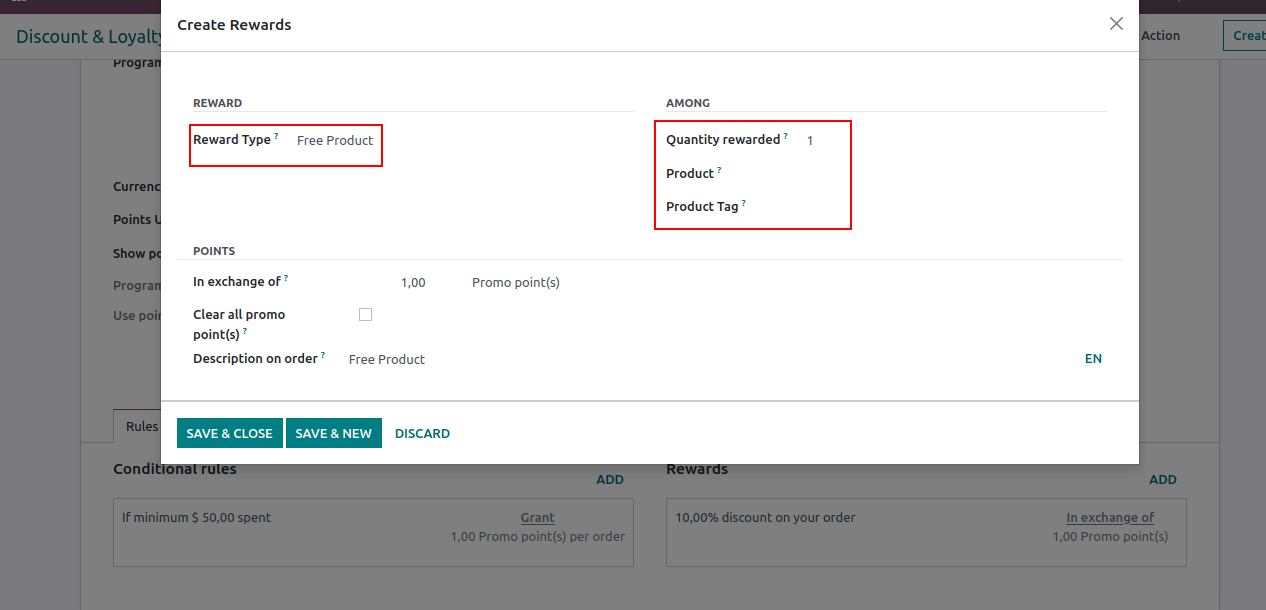
Reward Type as a Discount:
Discount is a reduced price offered by a business on a product or service. Reward type set to Discount from Create Rewards form.
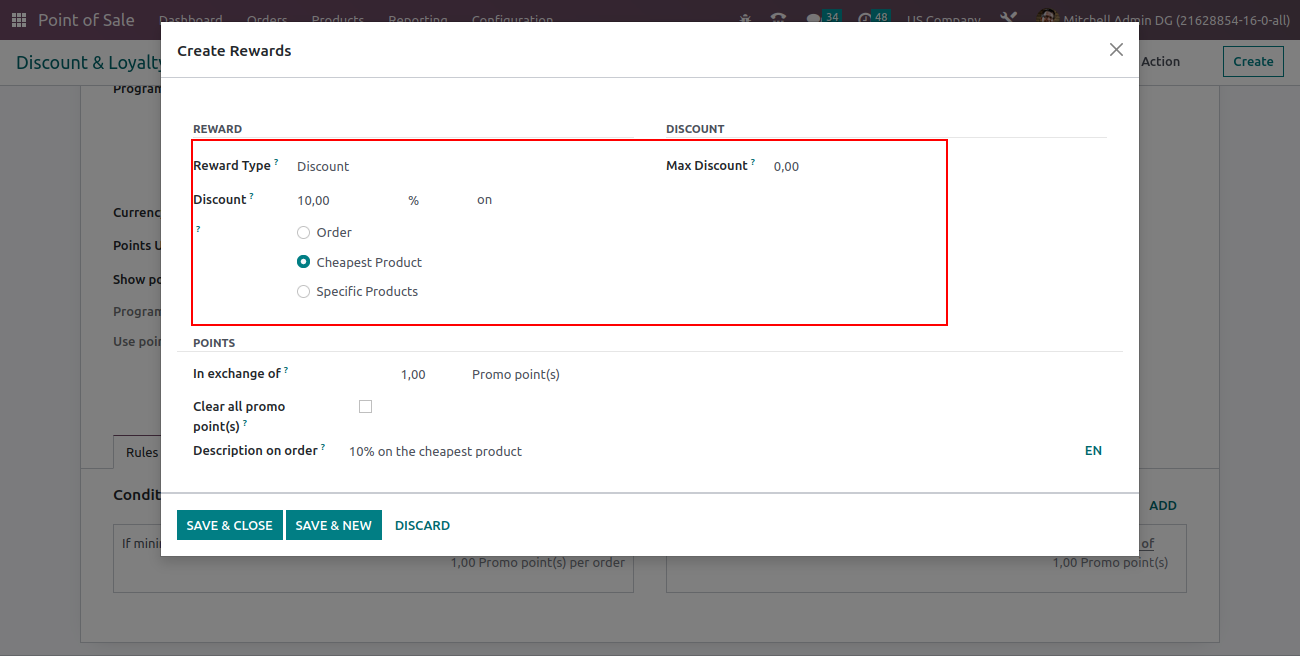
Discount: Set Discount Amount and then, Odoo allows you to apply discounts to various methods. You can apply a discount to the entire order or you can set discounts to the cheapest product of the order and you have to apply the discount to selected specific products. When discount is set to specific products, we can see the selected based on discount product with domain, based on discount product category or based on discount product tag.
Max Discount: You can specify the maximum discount amount.
Gift cards & e-Wallet
Merchants around the world use gift cards to build awareness and increase sales. Adding gift cards to your marketing mix will keep your customers more engaged and keep them coming back.
Selecting the Gift cards & e-Wallet menu under Product menu, you will jump into the Gift cards & e-Wallet window as displayed below in list view. Odoo arranges and maintains all previous records of Gift cards & e-Wallet. Contains each record by program name, program type, items, website, point of sale, company, etc.
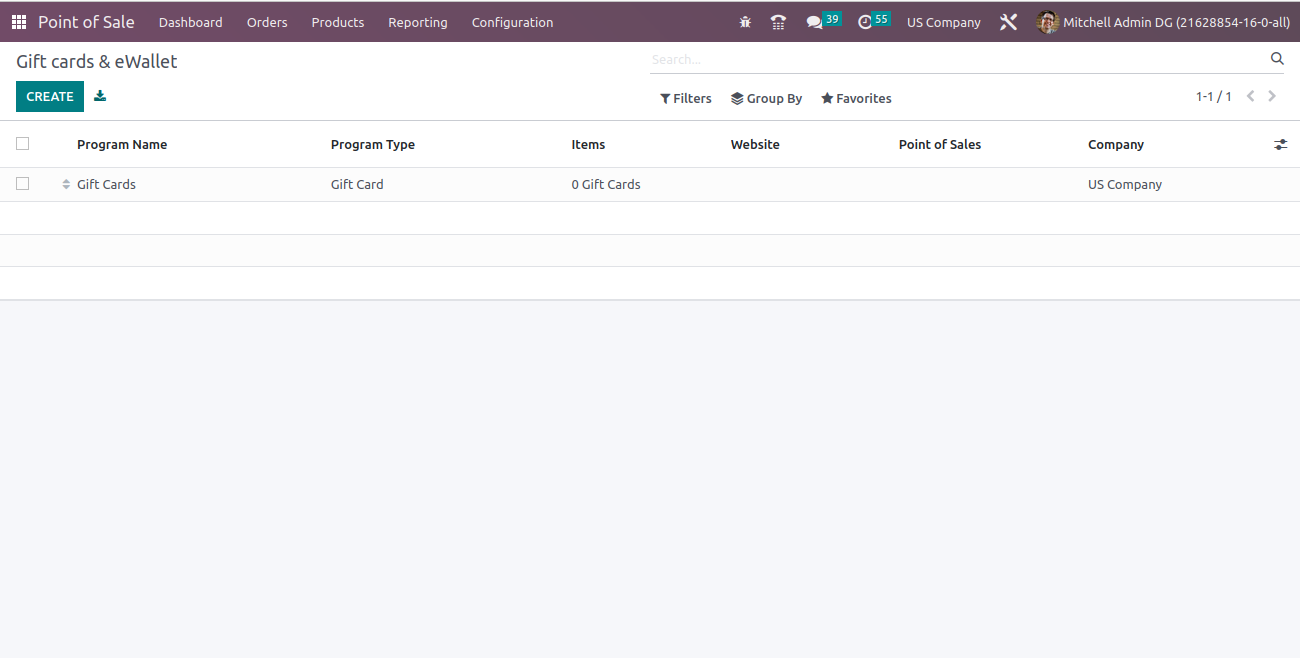
Select a record from the list and see form view of the record. Create new record by clicking Create button from right top corner, let’s show the image below.
First, you can name the program in the Program Name field. Then Choose which program is selected From Program Type, these programs are Gift Card and Wallet. When the customer orders a gift card product, gift cards are generated manually or sent automatically via email. Then, gift cards can be used to pay for orders. e-Wallets are created manually or automatically when the customer orders an e-Wallet product. Then, during checkout, e-Wallets are suggested to pay the orders. Gift card product and Email Template are added to these respective filed.
After providing all the required information, you can save by clicking on the SAVE button. The GENERATE COUPON button available in the Left top of the window allows you to generate coupons. When you click on the button, you will be able to view a pop-up window as shown in figure.
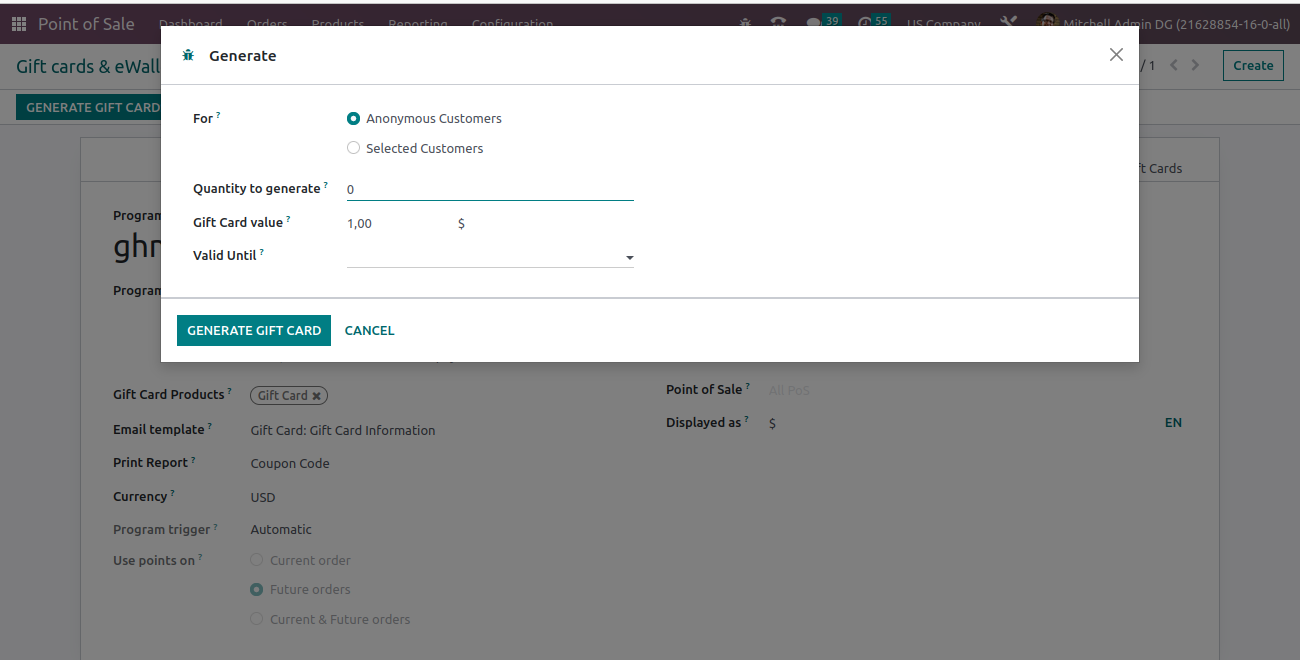
You can assign Anonymous Customers as well as Selected Customers.If you select Customers, specify which customers you wish to issue the Gift Card. How many gift cards will be generated is specified to Quantity to generate field. Number points granted through the gift card and validity of gift card are added to this popup. Click on the GENERATE GIFT CARD button on the popup and let’s we can see below image.

REPORTS
Orders Analysis
The main feature of the Odoo is that it generates the required document based on the record. This helps in evaluating the activities of the business as well as help in improvising them. The report based on the orders from the point of sale can be viewed by selecting the Orders option from the Reporting tab. Odoo is that it generates with more flexible, because You can generate report with different measures such as Average Price, Delay Validation, Margin, Product Quantity, Sale Line Count, Subtotal without Discount, Total Discount, Total Price and Count.
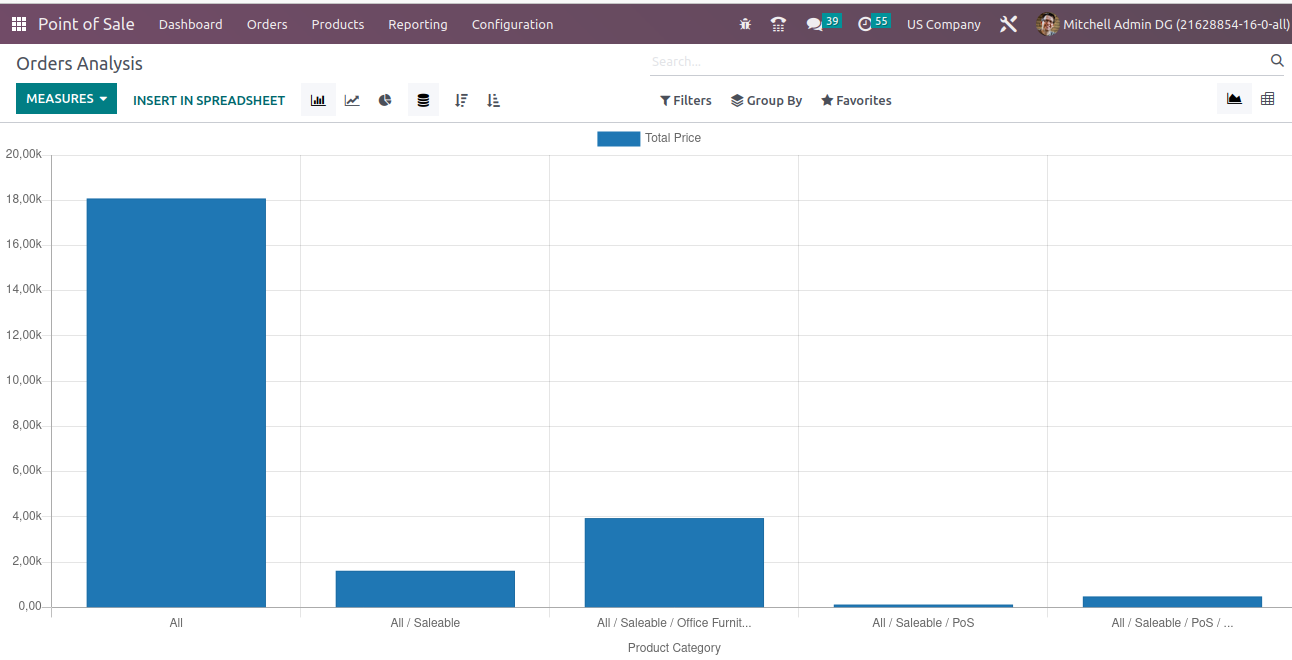
This report is inserted into the spreadsheet by clicking on the INSERT IN SPREADSHEET. You can view the report in Bar Chart, Line chart, Pie chart and also, we can view in ascending and descending order of the different measures.
Sales Details
Sales details report is given from sales details menu under the Reporting menu. Selecting the Sales Details menu, you can see the popup. Set values start date and end date and added the point of sale. Filter PDF report based on start date, end date and point of sale.
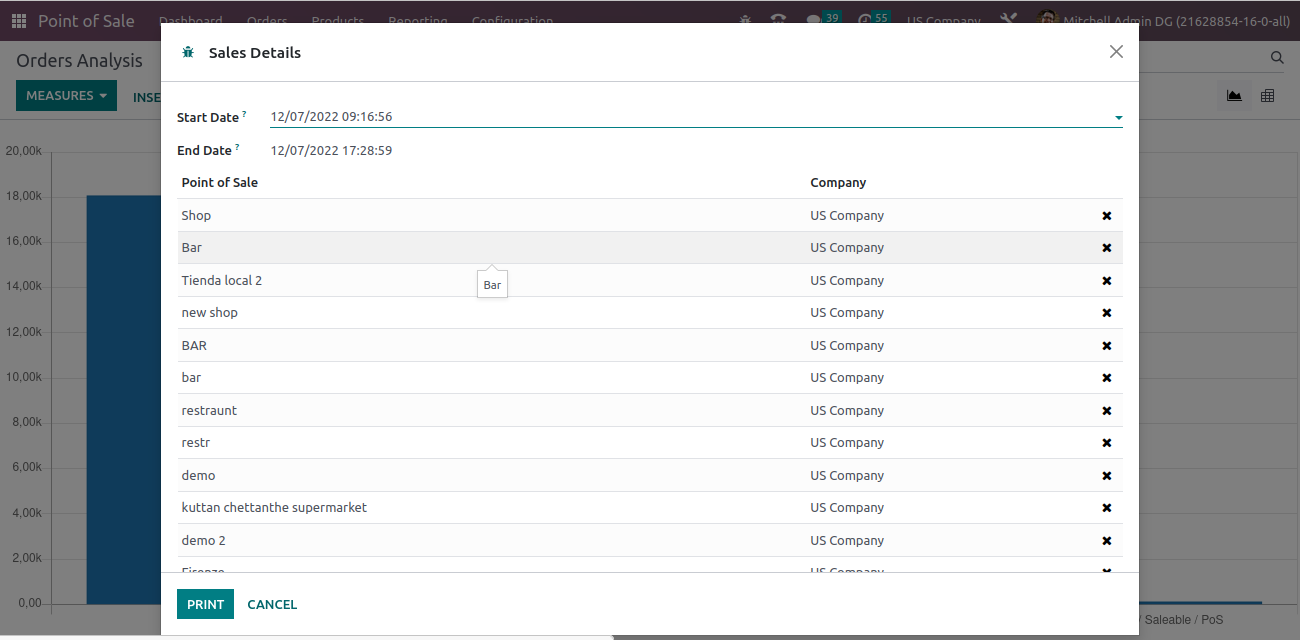
By click on the PRINT button, you will get the PDF report.
Daily Reports:
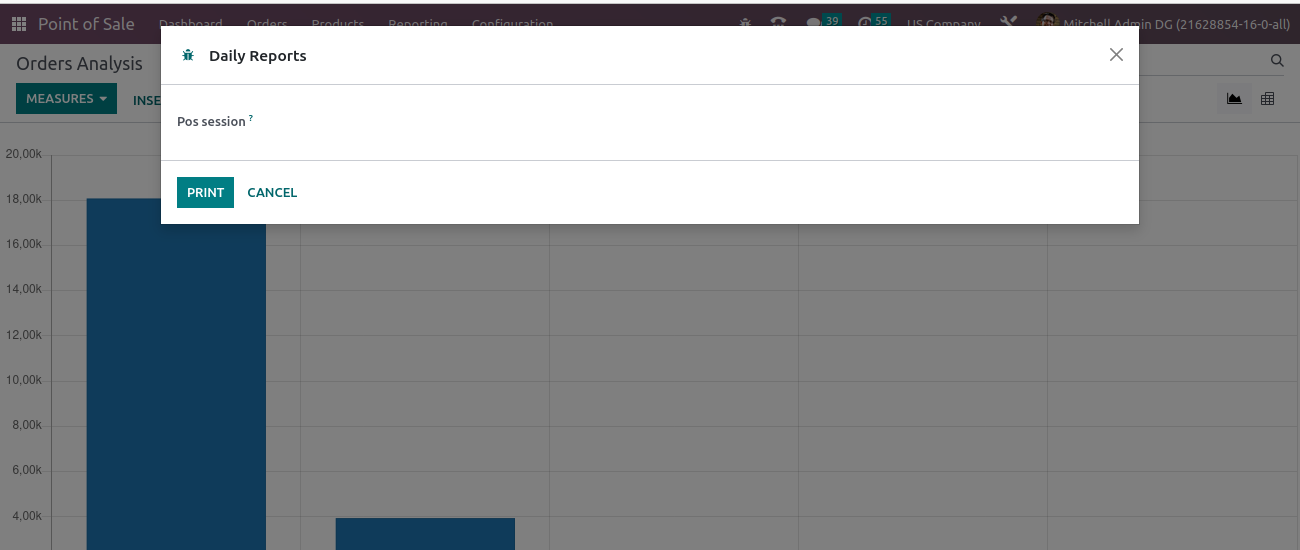
Daily report generates report on daily basis using pos session.
Payment Methods
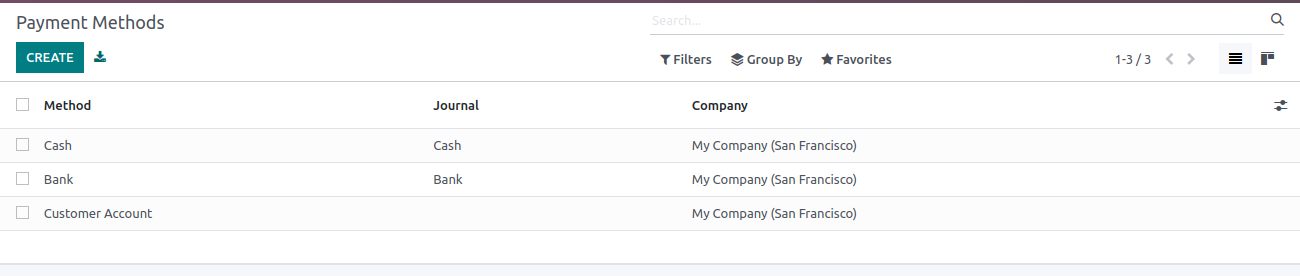
Payment method helps you decide what type of payment you want to accept from customers. Different types of payment methods are now available, examples are mobile payments, cash, e-wallets, bank transfers, credit/debit card payments and prepaid card payments. They try to adjust the application and method according to their convenience. In Odoo 16, we used different payment methods. Like cash, bank, customer account and payment terminals.
Let's see how to configure payment methods. Select payment methods under configuration tab at point of sale. Then you will see a window with different types of payment methods in the list view. Let's look at the picture below.
To add a payment method, click CREATE button. This opens the Payment Methods form window where you'll complete the following each required field and then save.
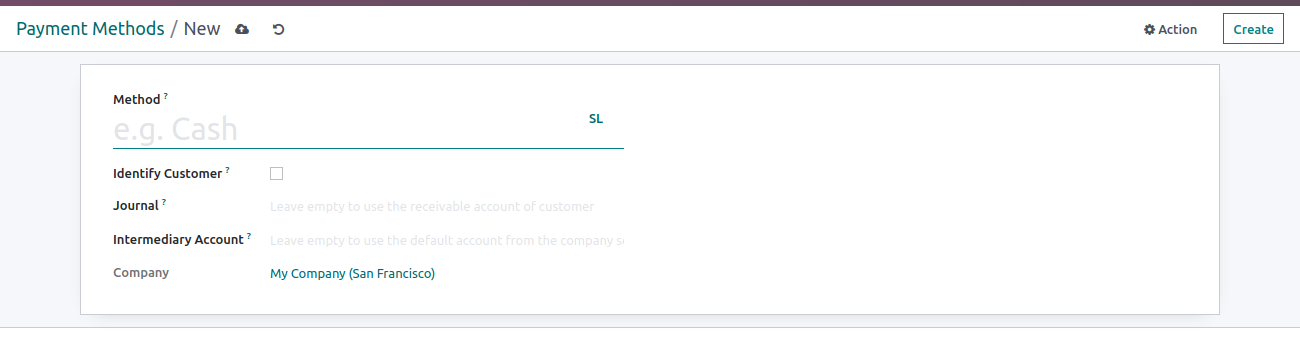
Method: Enter the payment method name.
Identify Customer: Forces This payment method also forces a customer to be set up when splitting journal entries for each customer.
Journal: Leave blank to use a customer's receivable account. Define the journal where the collected payments should be booked after the session is closed. For the bank journal, write the outstanding account specified in this payment method. It Only cash and bank journals are allowed.
Intermediate Account: Leave blank to use the default account from Company. Reversing the Company's Accounts Receivable account used in the journal entries for the point of sale.
Company: For company details
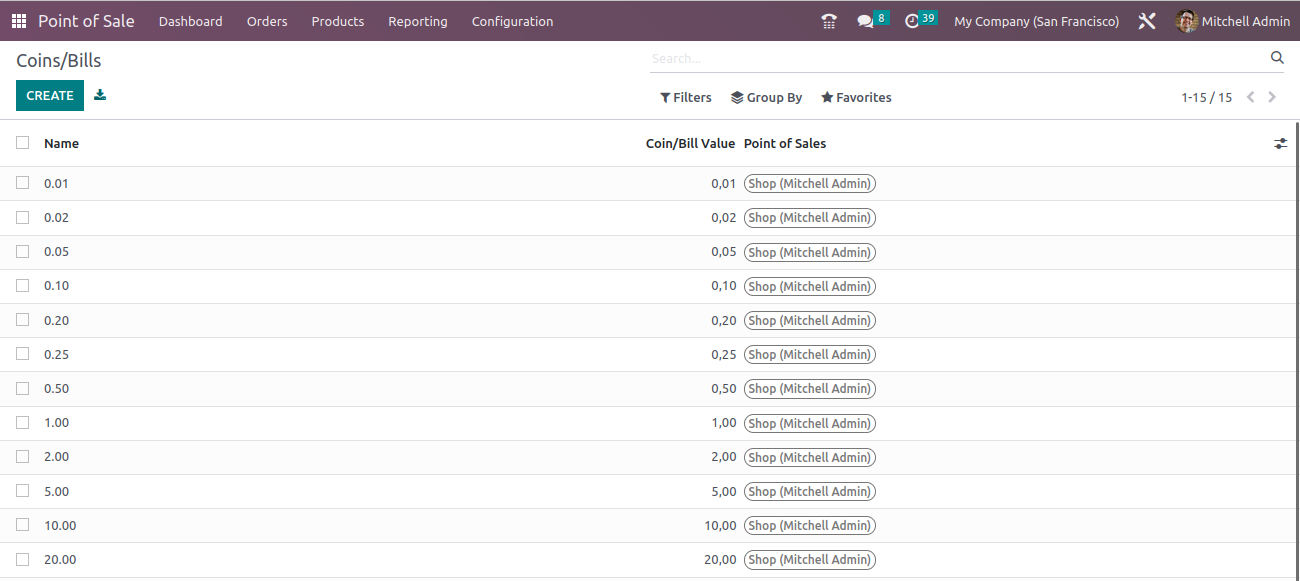
Coins/Bills
Coins are used when the salesman adds some opening balance when starting a new session. Similarly, enter the closing balance at the end of a session.
Coins/Bills are configured in the Point-of-Sale Coins/Bills menu under the Configuration tab. Then we can see already created coin/bills.
For creating new coins by clicking CREATE button.
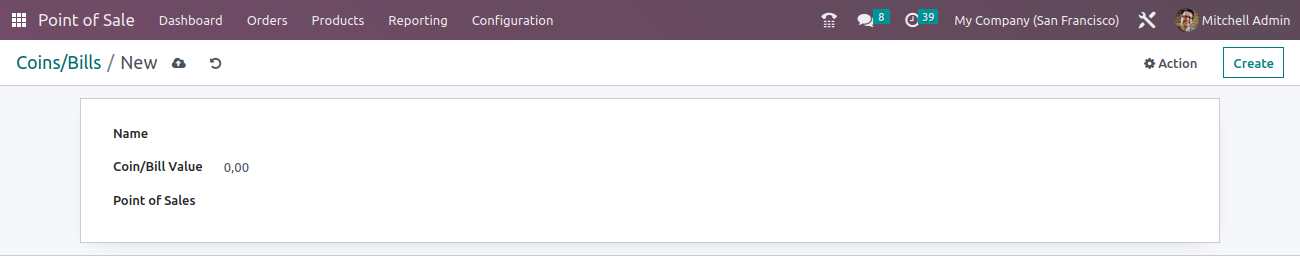
Complete the coin name and coin/bill value and then save.
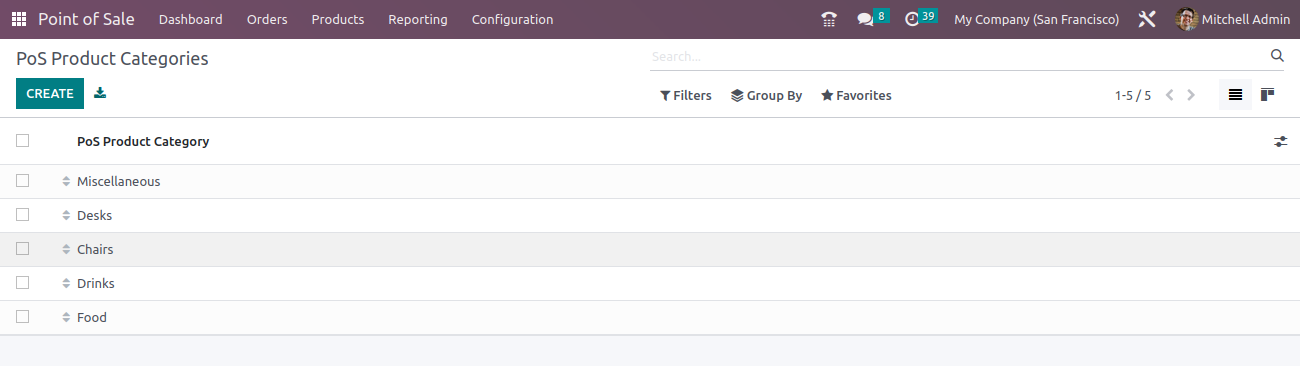
POS Product Categories
The Product Configurator allows us to select different product attributes and sell product variants to our customers.
Settings
The POS module's settings menu contains various advanced tools that allow you to access more features
POS Interface
You can configure the interface of the creating point of sale session in the POS interface menu. These configurations include:
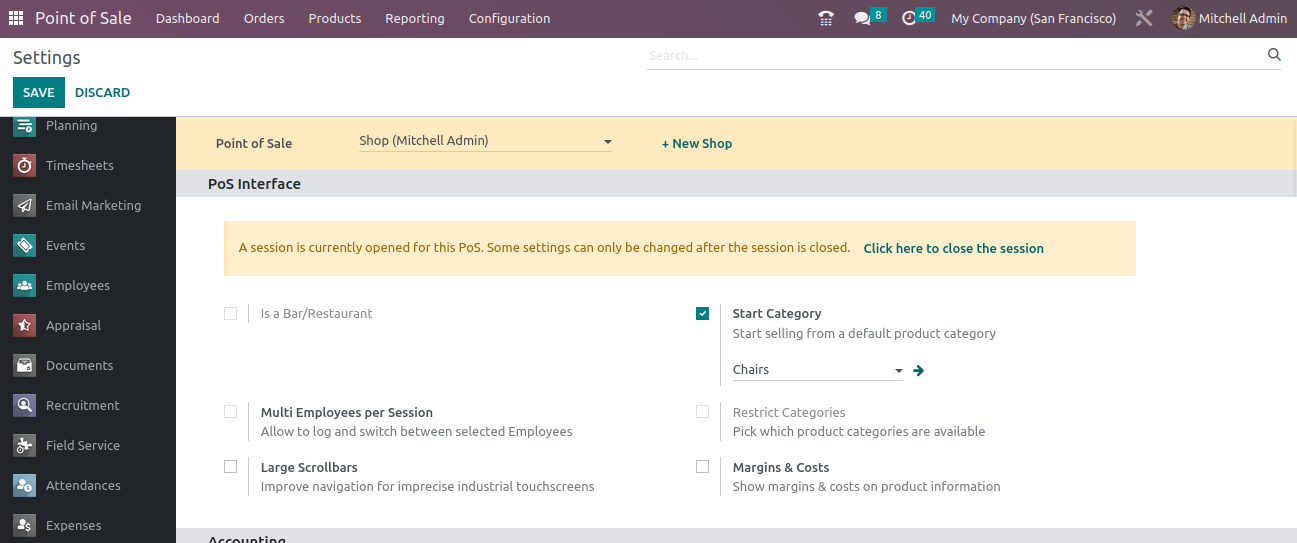
Is a Bar/Restaurant: You can select the Company is a Bar or Restaurant
Start Category:
Start selling from a default product category on the product screen. When the Start Category field is empty, the default category is the All category. When the Start Category field is set to Chair, let's look at the product screen, the default category will be Chair.
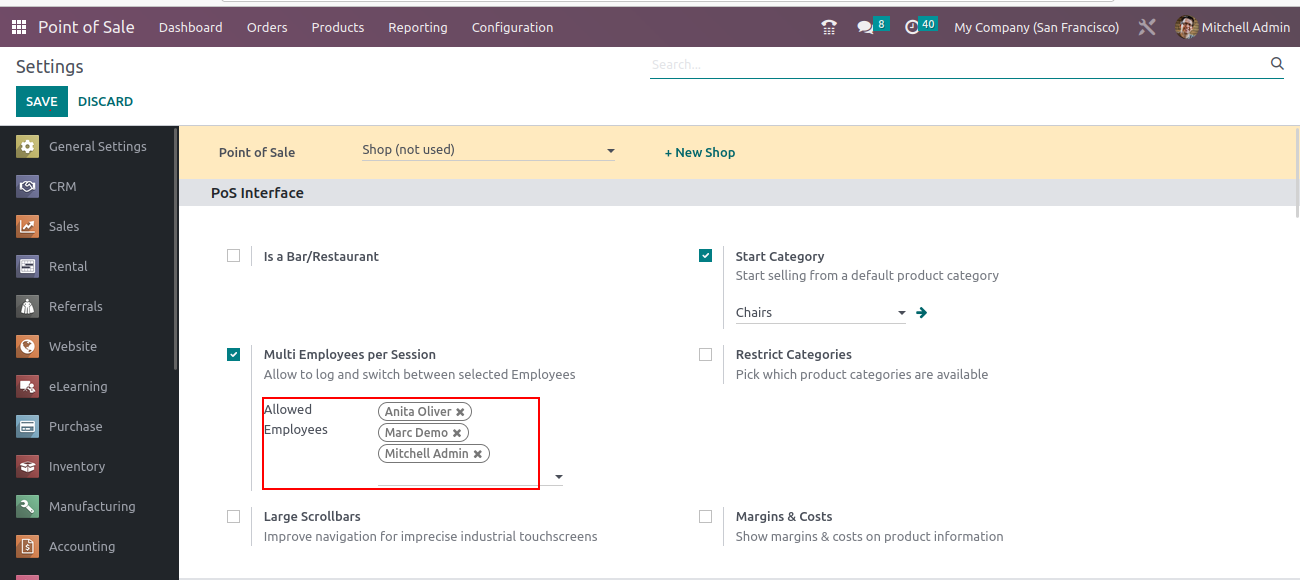
Multi Employees per Session:
Odoo allows sales for multiple users in one POS session. Here we explain how to do this. First select employees from Allowed Employees field from Point of Sale Settings.
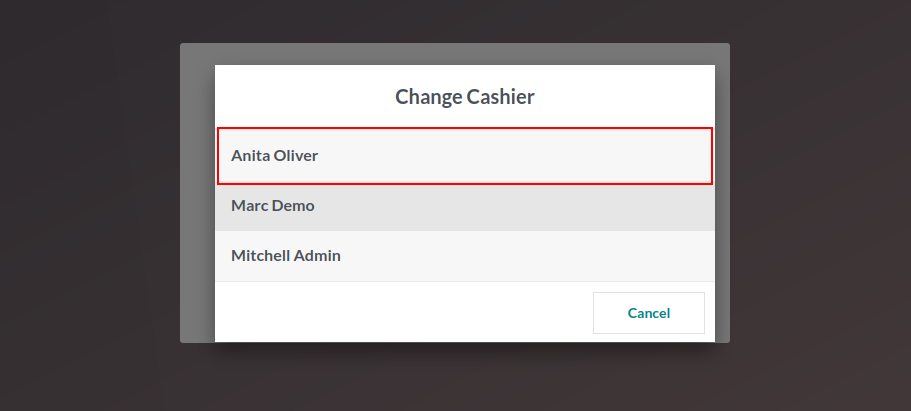
Next open the session and see the below window and select cashier.
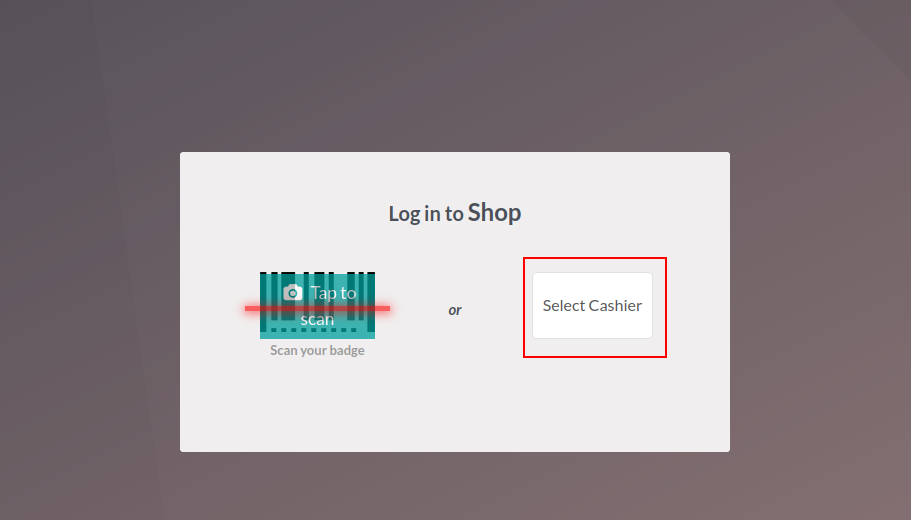
Then you can see option to select the employee for this session.
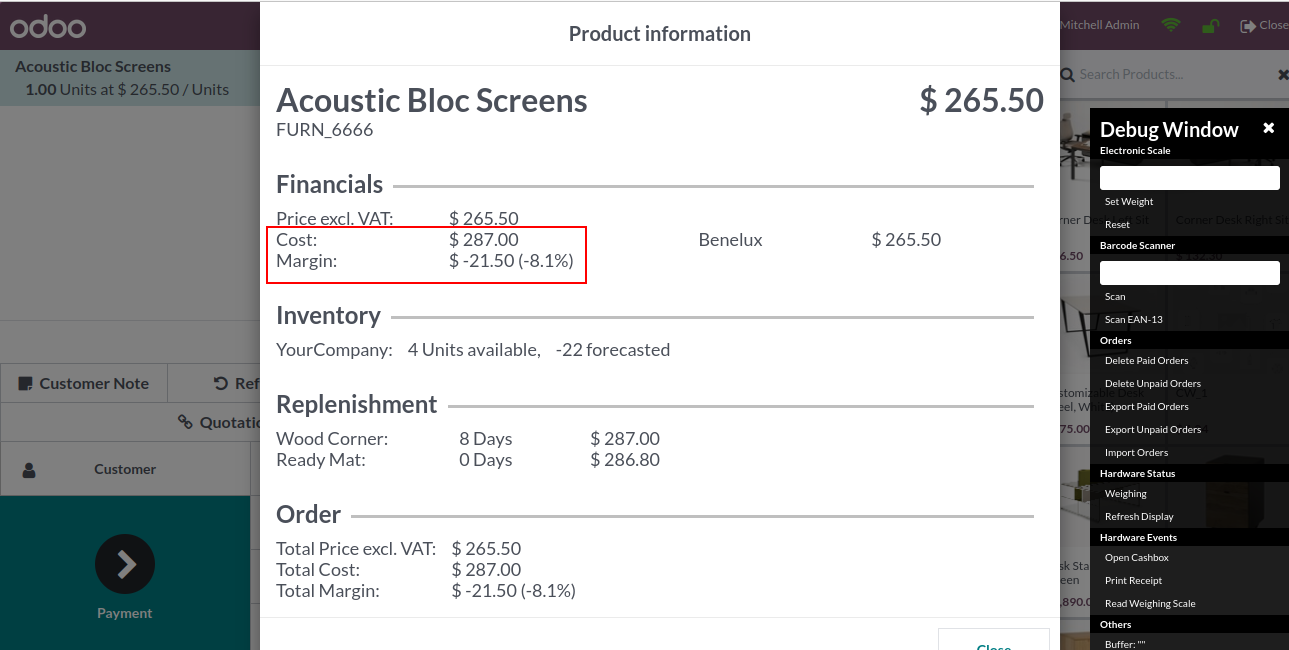
Margins & Costs:
When the user logs in to POS session and disables margins and costs, the margin and cost will be hidden in the product information for this user. When the manager logs in to the POS session and disables margins and costs, the margin and cost will be shown in the product information. When margins and costs are enabled, margins and costs are shown in product information for all users, shown figure below.
Pricing
You can set the price list for product in Odoo. different types of pricelists are available, Multiple prices per product and Advanced price rules.
Odoo 16 allows you to determine tax is included in the price and excluded price from receipt price.
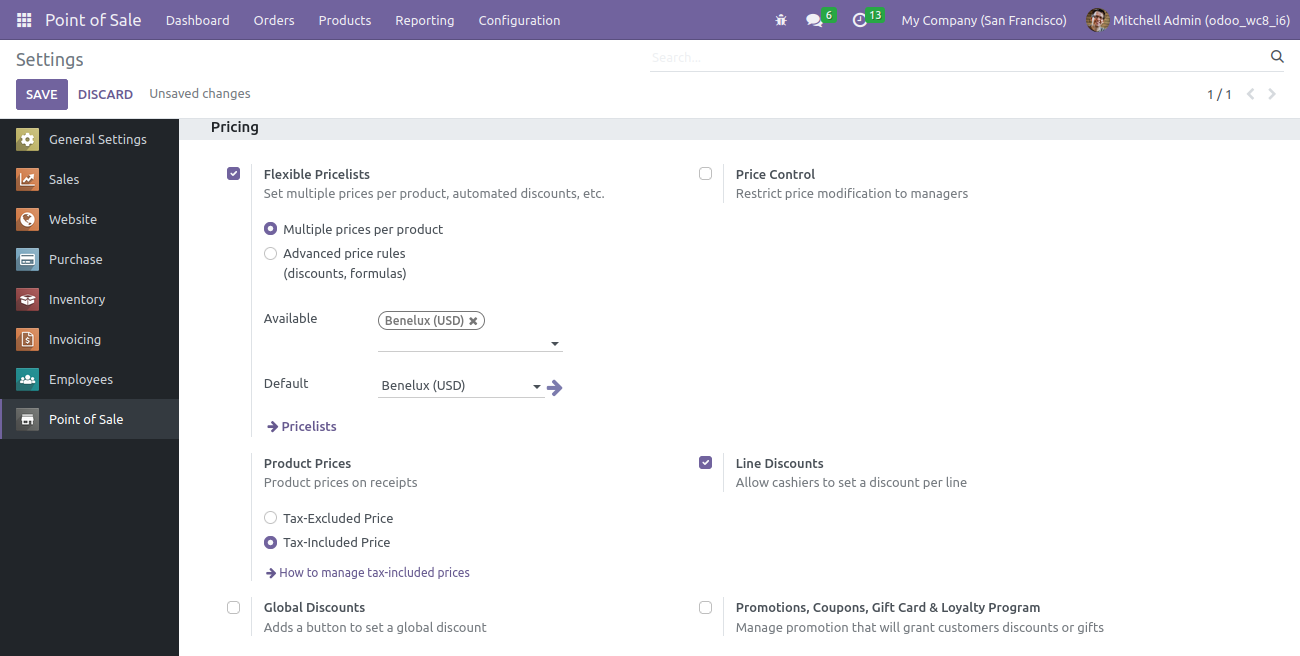
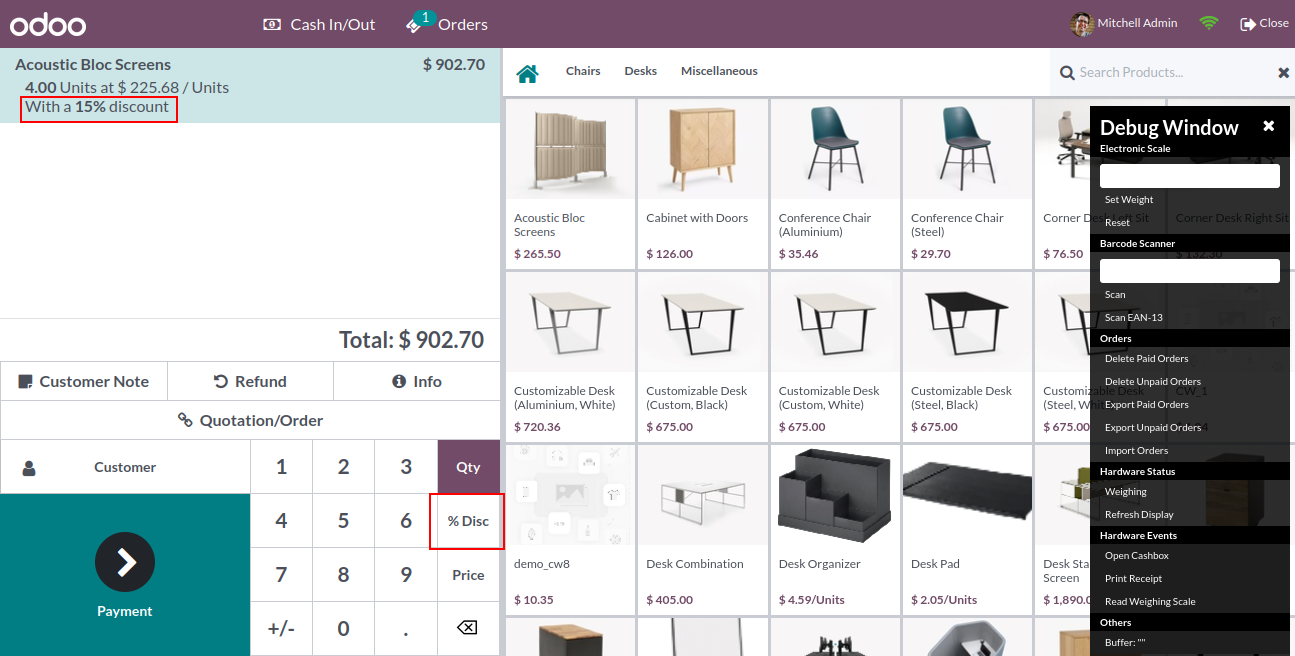
Line Discounts: When enable the Line Discounts field. The button will be enabled and allow cashiers to set the discount per order line on the product screen. shown in figure.
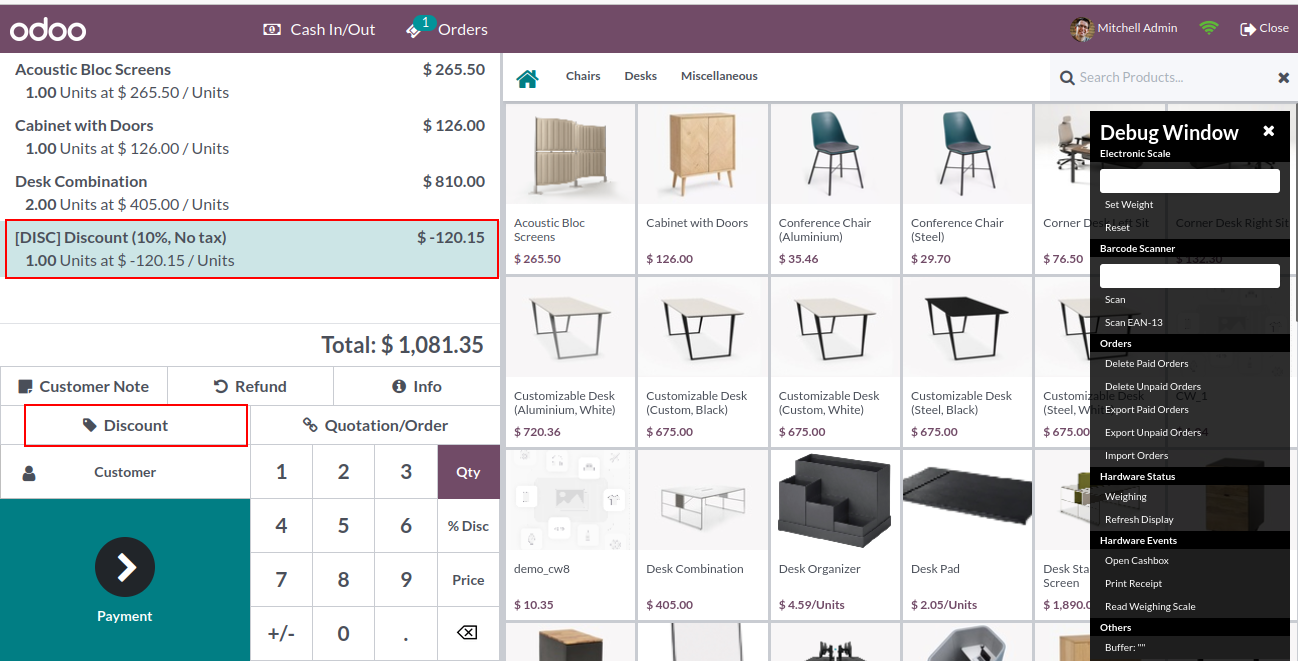
Global Discounts: To apply a discount to the entire order. select Global Discounts. After saving settings you can choose discount product and percentage of the discount. Then, a new discount button appears in your POS interface.
Promotions, Coupons, Gift Card & Loyalty Program:
Under the Pricing section from Settings, you can find Promotions, Coupons, Gift Card & Loyalty Program as shown in the screenshot above. After activating the Promotions, Coupons, Gift Card & Loyalty Program, you can see the menu for Discount and Loyalty and Gift Cards and e-Wallet under the product menu.
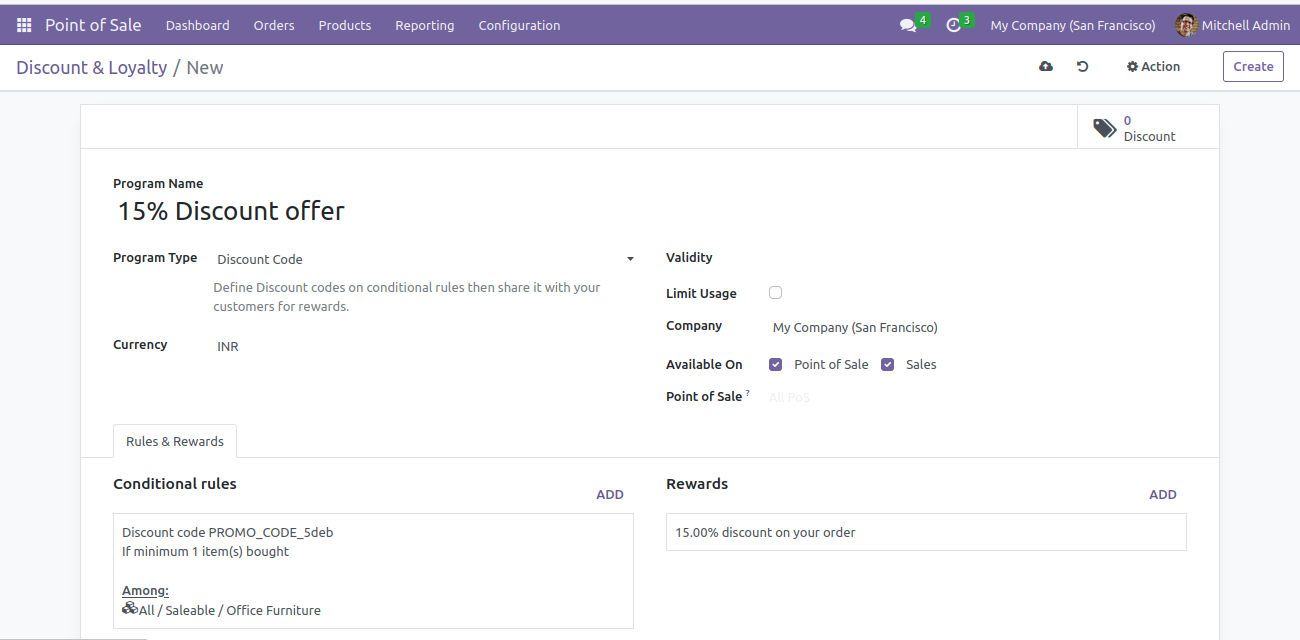
Create a discount code program now. Set the name to 15% discount offer. In the conditional rules popup, you can get the discount code by default or you can set the discount code as you like. Here the minimum purchase amount for this reward is assigned to 1 and the product is filtered in the All / Salable / Office Furniture category. In the Rewards popup, reward type is set to Discount, define reward as 15% discount on order as shown in figure below
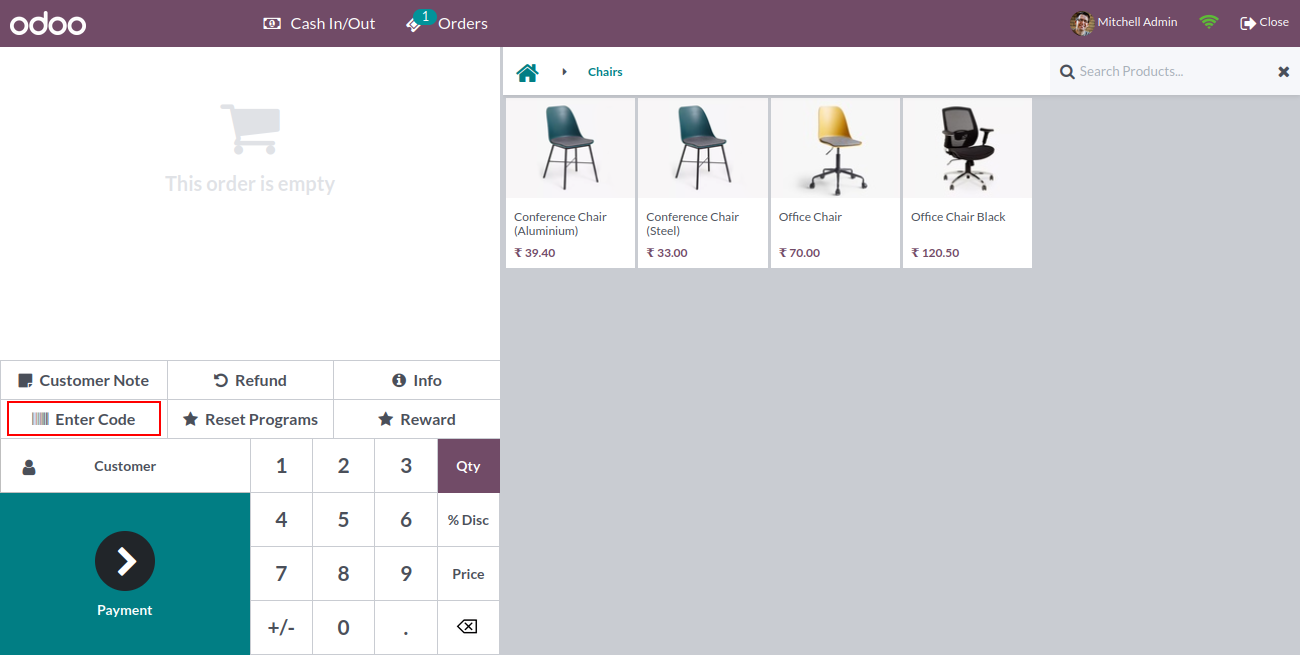
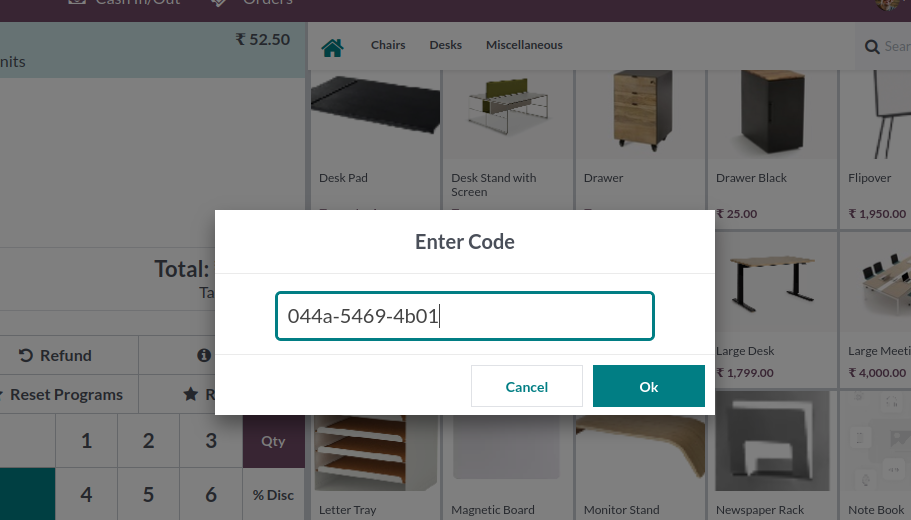
In the POS interface, add the product under the filtered product section and click the Enter Code button in the POS interface.
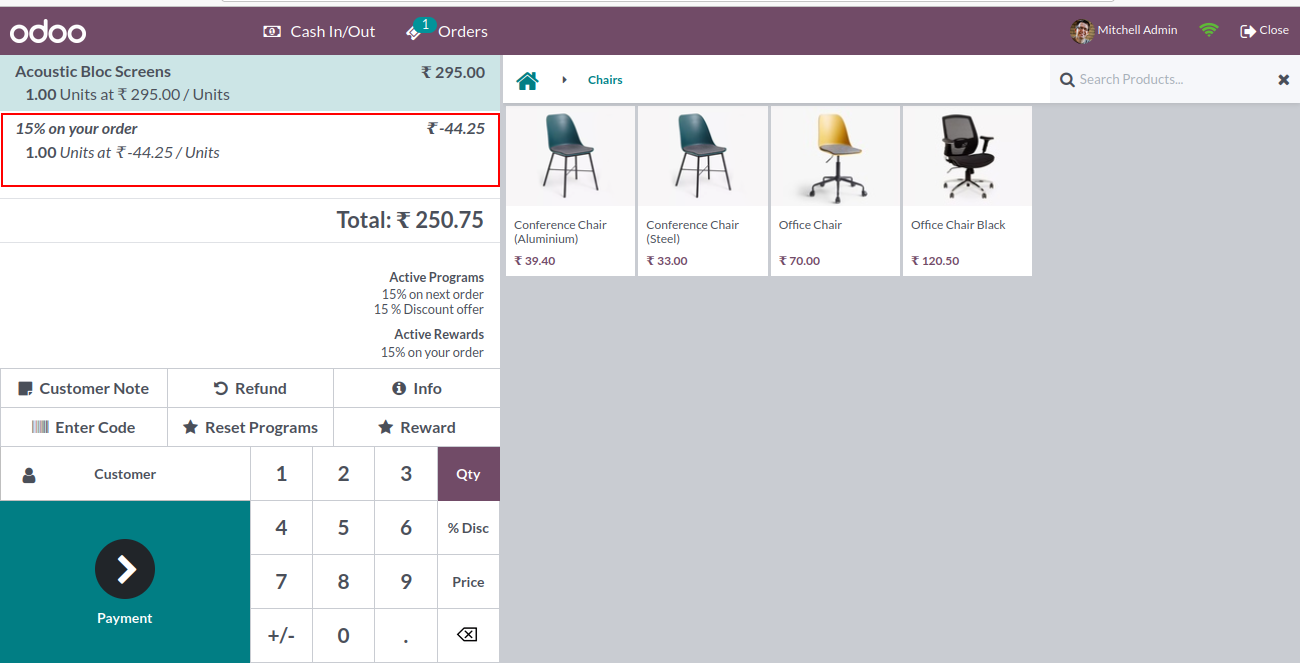
Then you can see a popup. Enter your discount code and see new order line created for this discount
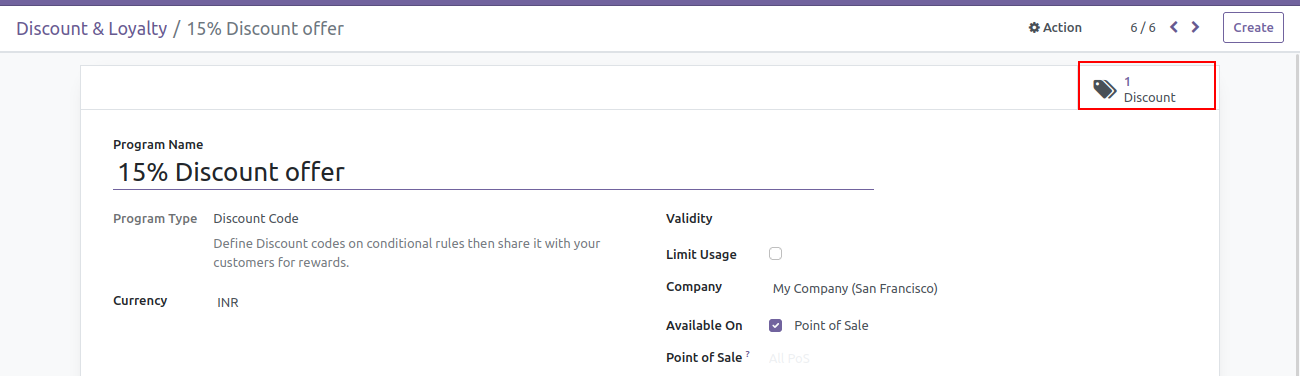
Generates a coupon, which is displayed in the program configuration
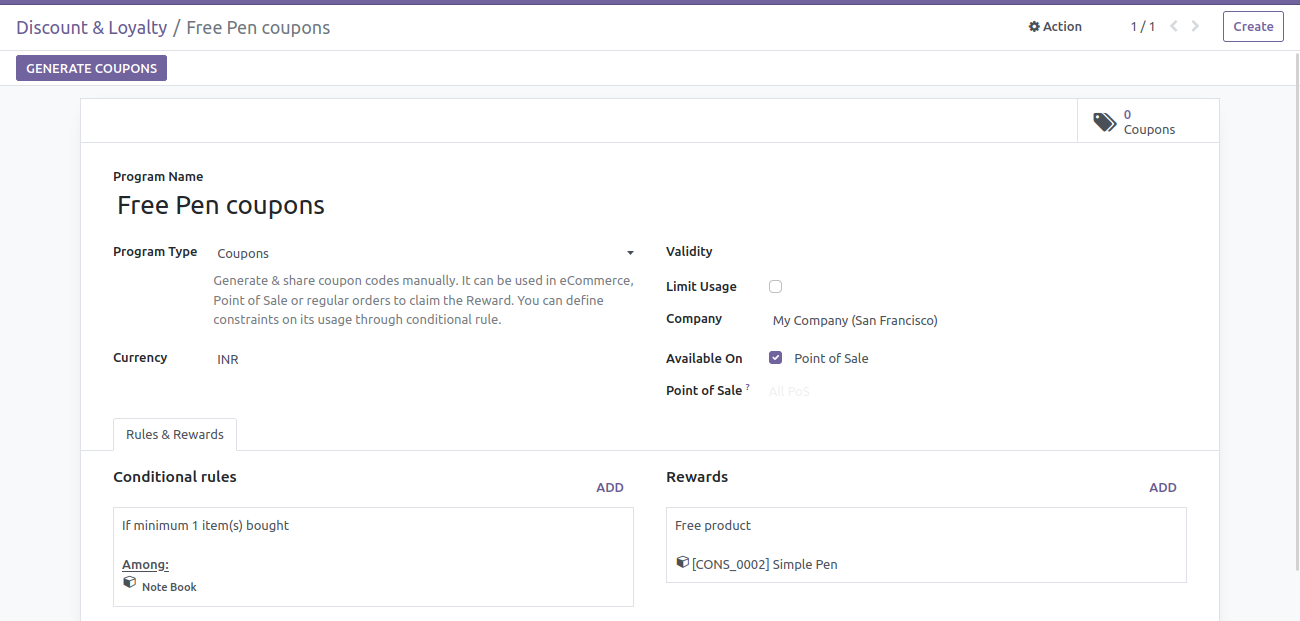
In case of program type ‘coupons’, create a new program and name its Free Pen coupons. This program defines a simple pen free with the purchase of at least 1 notebook. After creating program, generate coupons using GENERATE COUPONS button.
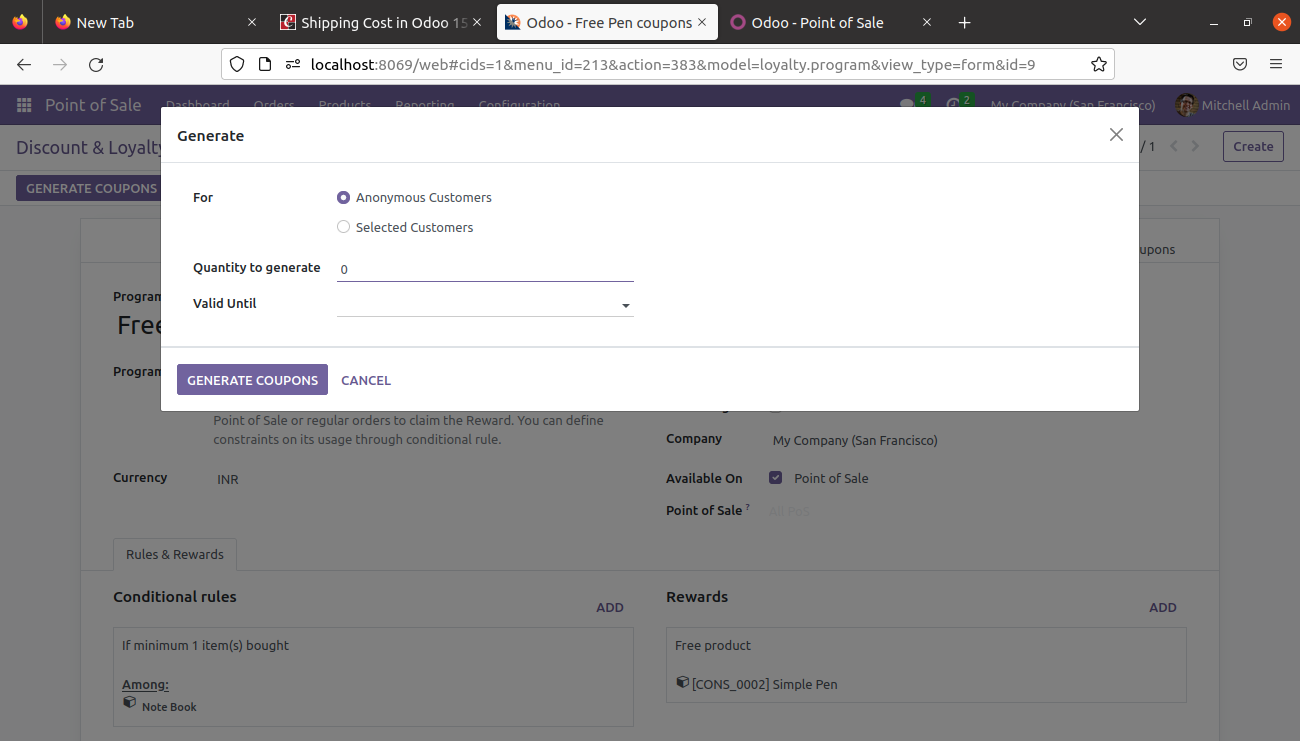
Then define number of coupons as 10, this coupon is set for all customers. Click on GENERATE COUPONS.
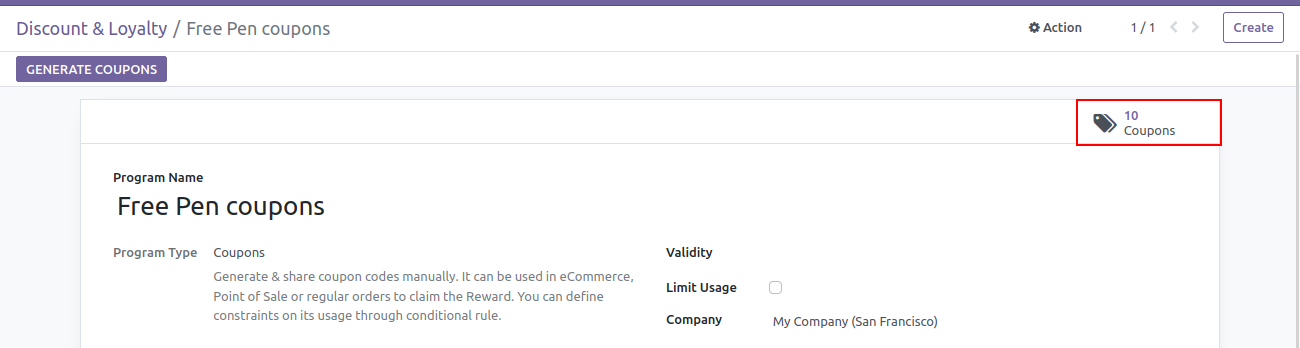
You can see generate coupons shown in figure below.
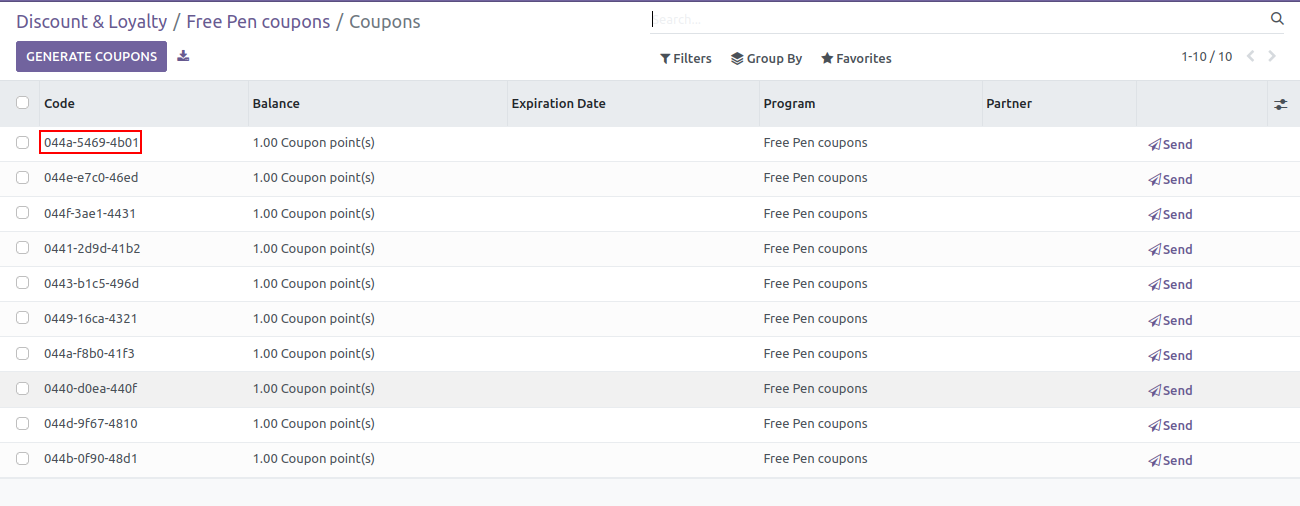
Click on the smart button (Coupons) shown above. You can see all the coupons. Copy one of the coupon codes.
Add the notebook from the product screen in the Pose interface. See the Enter Code button from the Pos interface, click it, and enter the code into the popup.
After that the reward button will be highlighted as shown in the image.
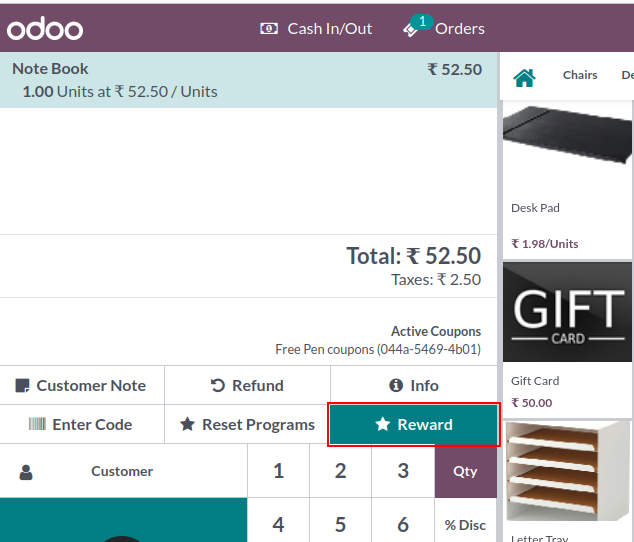
Click on the reward button and you can show that the new order line was created for the free product.
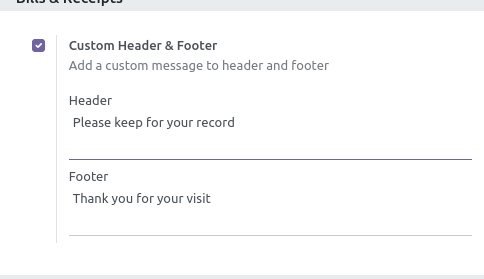
Bills & Receipts
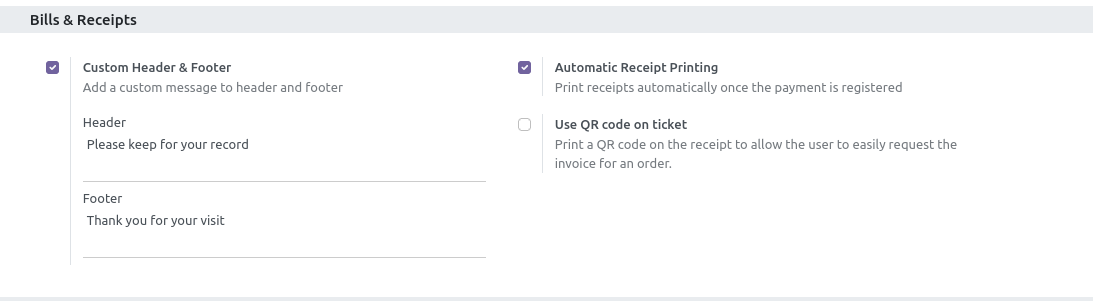
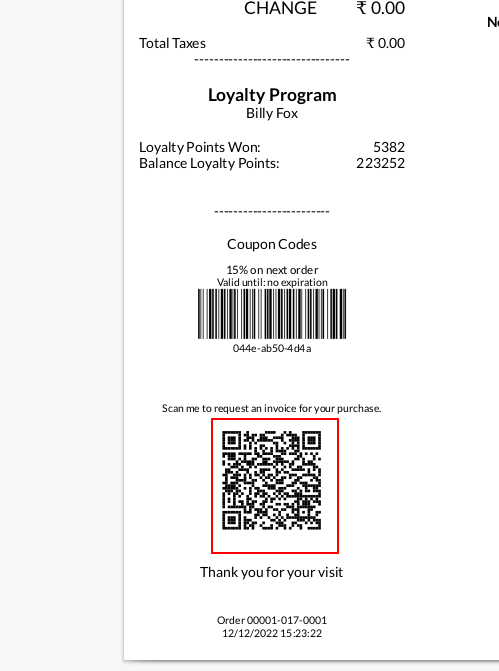
Custom Header & Footer: Add a custom message to the header and footer for the receipt.
Automatic Receipt Printing: Once the payment is validated, it will be printed automatically without clicking the print button.Use QR code on ticket: POS QR Code Receipt helps Odoo users to print QR code when receiving POS. Users can enable or disable the option to print QR code and the QR code will be printed on the point of sale order receipt.
Payment
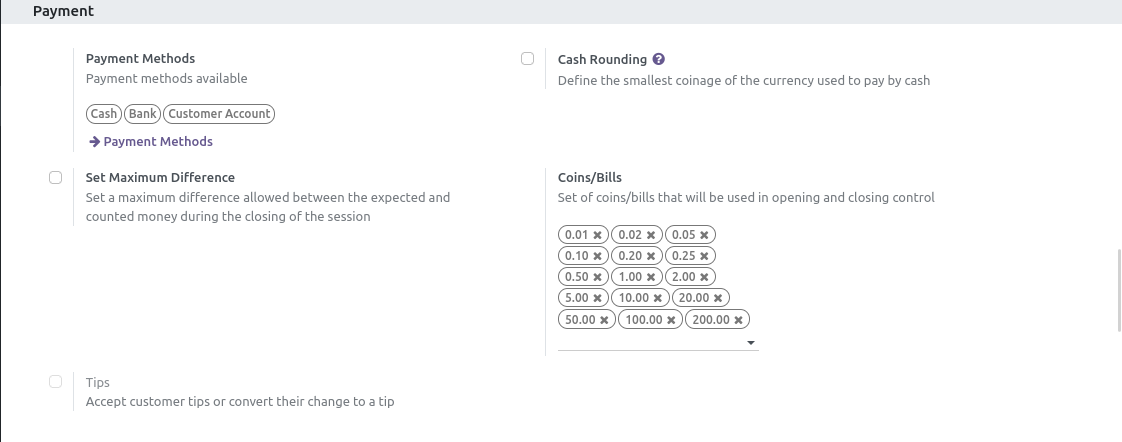
Payment Methods: In the payment section of POS settings, you can see a place where we can add payment methods in the current session. One or more payment methods are used on time. So we can add multiple values in this field.
These payment methods are shown on the payment screen of the point-of-sale interface shown in the figure below. You select a payment you want to pay.
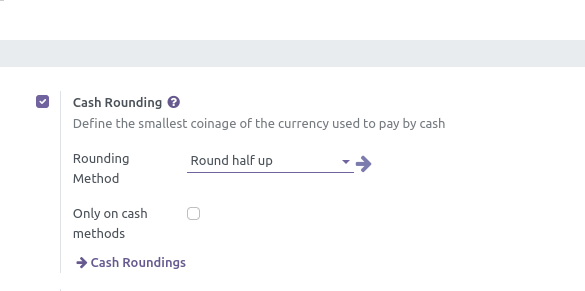
Cash rounding: Cash rounding is required that companies round up or down the total amount of a bill. Round the figures for each entry to the nearest decimal, unless it affects materiality. The material allows accountants to make rounding entries as long as the final results from rounding provide an accurate representation of the company's financial position.
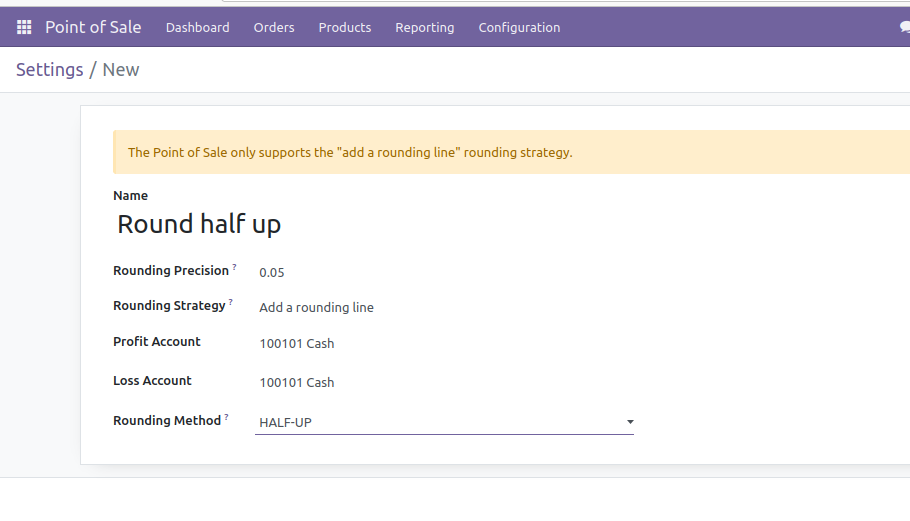
Name: Add the name of the rounding
Rounding Precision: The precision of a numerical value describes the number of digits used to express that value, including digits to the left and right of any decimal point.
Rounding strategy: Two options are available Add a Round A line and update the tax amount
Account: which account where the rounding will go.
Rounding Method: You can use 3 different methods for rounding, either UP, DOWN or HALF-UP.
UP: Value based on rounding precision round positive infinity.
DOWN: Value based on rounding precision round negative infinity.
HALF-UP: When the fractional part of a value is greater than or equal to 0.5, round to half plus infinity, otherwise round to minus infinity.
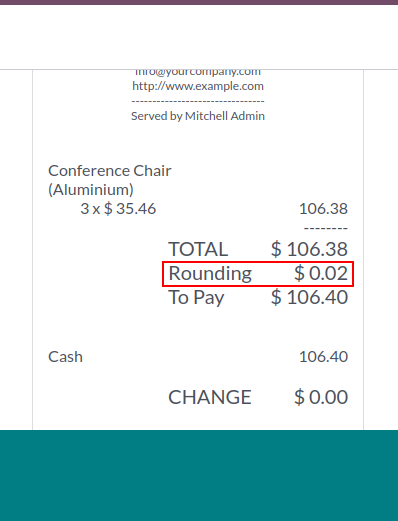
Set rounding from settings under payment. Defines which rounding you should use.
After that you can see in the receipt.
Set Maximum Difference: Set the maximum allowable difference between the expected and estimated money at the end of the session
Coins/Bills: Set of coins/bills that will be used in opening and closing control in the current session.


0