Muhammed Thamam MubarisApril 6, 2026
Have you ever had to manually track an employee's court-ordered wage garnishment across multiple pay periods? Or tried to set up a recurring salary deduction - and lost track of it two months later in a spreadsheet? If that sounds familiar, you're not alone. Managing these kinds of payroll changes is one of the most error-prone tasks in HR.
Odoo 19 addresses this problem head-on with a dedicated Salary Adjustments feature inside the Payroll module. It gives you a structured, auditable way to apply deductions, garnishments, and other recurring pay changes directly to individual employees - without touching your core salary structure.
This guide walks you through everything you need to know about salary adjustments in Odoo 19, from understanding what they are, to setting one up step by step.
A salary adjustment, in the context of Odoo's payroll system, is a modification applied to an employee's paycheck that sits outside their regular base salary. Think of it as an add-on or deduction that gets factored into their payslip automatically once configured.
Common examples include:
In Odoo 19, these are managed through the Payroll app → Employees → Salary Adjustments section.
When you install the Odoo Payroll module, three salary adjustment types come pre-configured out of the box:
Each type has a Name and a Code, which Odoo uses internally when calculating payslips. It's worth knowing that these default types are connected to salary rules and your installed localization package - so it's best not to modify them, especially if they've already been used on payslips. Doing so can break salary rule calculations.
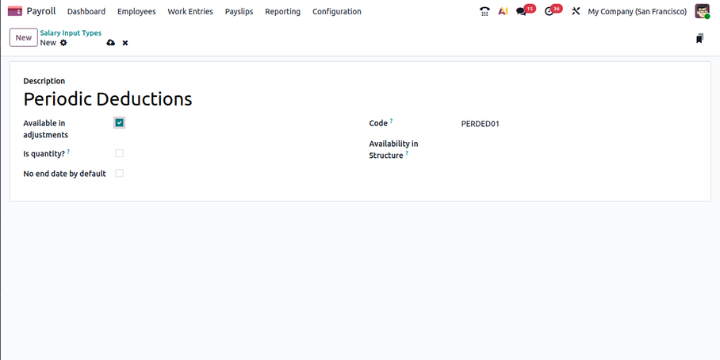
If none of the default types fit your needs, you can create a custom one. Here's how:
Keep in mind: each adjustment type you create needs to be configured separately for each employee it applies to.
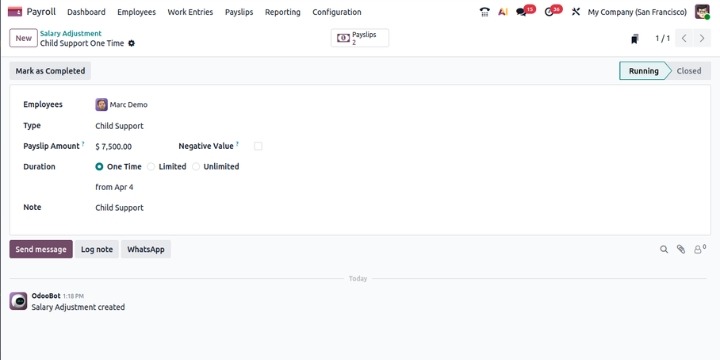
Once your adjustment types are ready, here's how to assign one to a specific employee:
Employee — Pick the employee this adjustment applies to.
Description / Note — Add a short note explaining the context (e.g., "Court order ref. #12345").
Type — Select the appropriate salary adjustment type from the dropdown.
Payslip Amount — Enter how much should be deducted from each paycheck.
Negative Amount — Tick this checkbox if the adjustment needs to be calculated as a negative value in the payslip.
Duration — This is where Odoo 19 gives you real flexibility. You have three options:
From - Set the start date using the calendar selector.
If you choose Limited as the duration, an additional Until (amount) paid field appears. Enter the total amount that needs to be collected before the adjustment ends.
Every salary adjustment in Odoo 19 has one of two statuses:
When the full Limited amount is collected, Odoo automatically marks the record as Closed and stops deducting. No manual intervention needed.
However, if Odoo doesn't close it automatically for some reason, you can do it manually from the Salary Adjustments dashboard.
To view all adjustments and their statuses, go to Payroll app → Employees → Salary Adjustments. The list is sorted by start date, with the most recent at the top. You can sort by Type, Status, or Employee by clicking the column headers.
Once an adjustment is set up and active, Odoo automatically factors it into the employee's payslip during each pay run. You don't have to manually add it each time.
In Odoo 19, the payroll system - now built around Pay Runs (which replaced the older "Batches" concept) - picks up all active salary adjustments for included employees and applies them as per the configured rules.
This also means you get a clean audit trail. You can see exactly which adjustments were active during any given pay period, which is especially helpful during compliance reviews or employee disputes.
A few practical things worth keeping in mind:
This is a common point of confusion for beginners.
Salary rules are part of the overall payroll structure - they define how every employee's pay is calculated. Things like basic wage, overtime, tax deductions, and employer contributions are all salary rules. They apply broadly.
Salary adjustments, on the other hand, are individual-level configurations. They apply a specific deduction or addition to one employee at a time, for a defined period and amount. They're the right tool for anything that's employee-specific and temporary (or recurring but not universal).
Salary adjustments in Odoo 19 are a practical, well-structured way to handle the kind of payroll changes that used to require spreadsheets, reminders, and manual tracking. Whether you're managing a one-time deduction or a multi-month garnishment, the system handles the calculations, tracks the status, and stops the deduction automatically once the goal is met.
If you're already using Odoo's Payroll module and haven't explored salary adjustments yet, it's worth spending 15 minutes setting one up - you'll see right away how much simpler it is compared to handling these things manually.
Have questions about setting up salary adjustments for your team? Drop them in the comments below — we're happy to help.
You might also find these posts useful:
A salary adjustment is a recurring or one-time deduction (or addition) applied to a specific employee's paycheck, separate from their base salary. It's used for things like wage garnishments, child support, or voluntary recurring contributions.
Go to Payroll app → Employees → Salary Adjustments. From there you can view all existing adjustments, create new ones, and check their current status.
Yes. If you set the Duration to "Limited" and enter a total amount, Odoo automatically closes the adjustment and stops the deduction once the full amount has been collected across paychecks.
The three pre-configured types are Attachment of Salary, Assignment of Salary, and Child Support. These come pre-linked to payroll salary rules and the installed country localization.
Yes. Go to Payroll app → Configuration → Other Input Types, click New, and fill in the description, code, and optionally a salary structure. Make sure to check the "Available in adjustments" checkbox so it shows up when assigning adjustments to employees.


0